
Unlike previous projects, this semester has marked a turning point in my design process. For the first time, I’ve been able to fully manufacture my components, allowing me to accurately calculate real production costs and start thinking about how this work could exist in the real world, whether as made-to-order pieces or at a larger production scale.
This shift from concept to physical outcome has not only given me a clearer understanding of material costs and fabrication processes but has also helped me begin to explore viable retail pricing. The figures shown here are grounded in real material quotes, manufacturing times, and considerations of scale, reflecting a more realistic and professional approach to bringing a product to market.
Initial Research & Outreach
At the beginning of my production journey, I began researching sheet metal manufacturers both locally and across the UK. I knew from the start that my project wasn’t hand-crafted — it would rely entirely on industrial processes like laser cutting and CNC folding. Because of this, I wanted to understand both the capabilities and pricing structure of professional suppliers.
I reached out to 25 different companies with a short, direct email and an attached PDF that included basic specifications for each component. Here's what that email looked like:
Hi [suppliers name],
I’m working on a modular furniture design that utilises sheet metal fabrication. I’m reaching out to explore potential manufacturing options and obtain a quote for production.
I have attached a document with all the specifications for the components. Please let me know if you require any additional details
or if we could schedule a time to discuss further.
Looking forward to your response.
Best regards,
George Potter
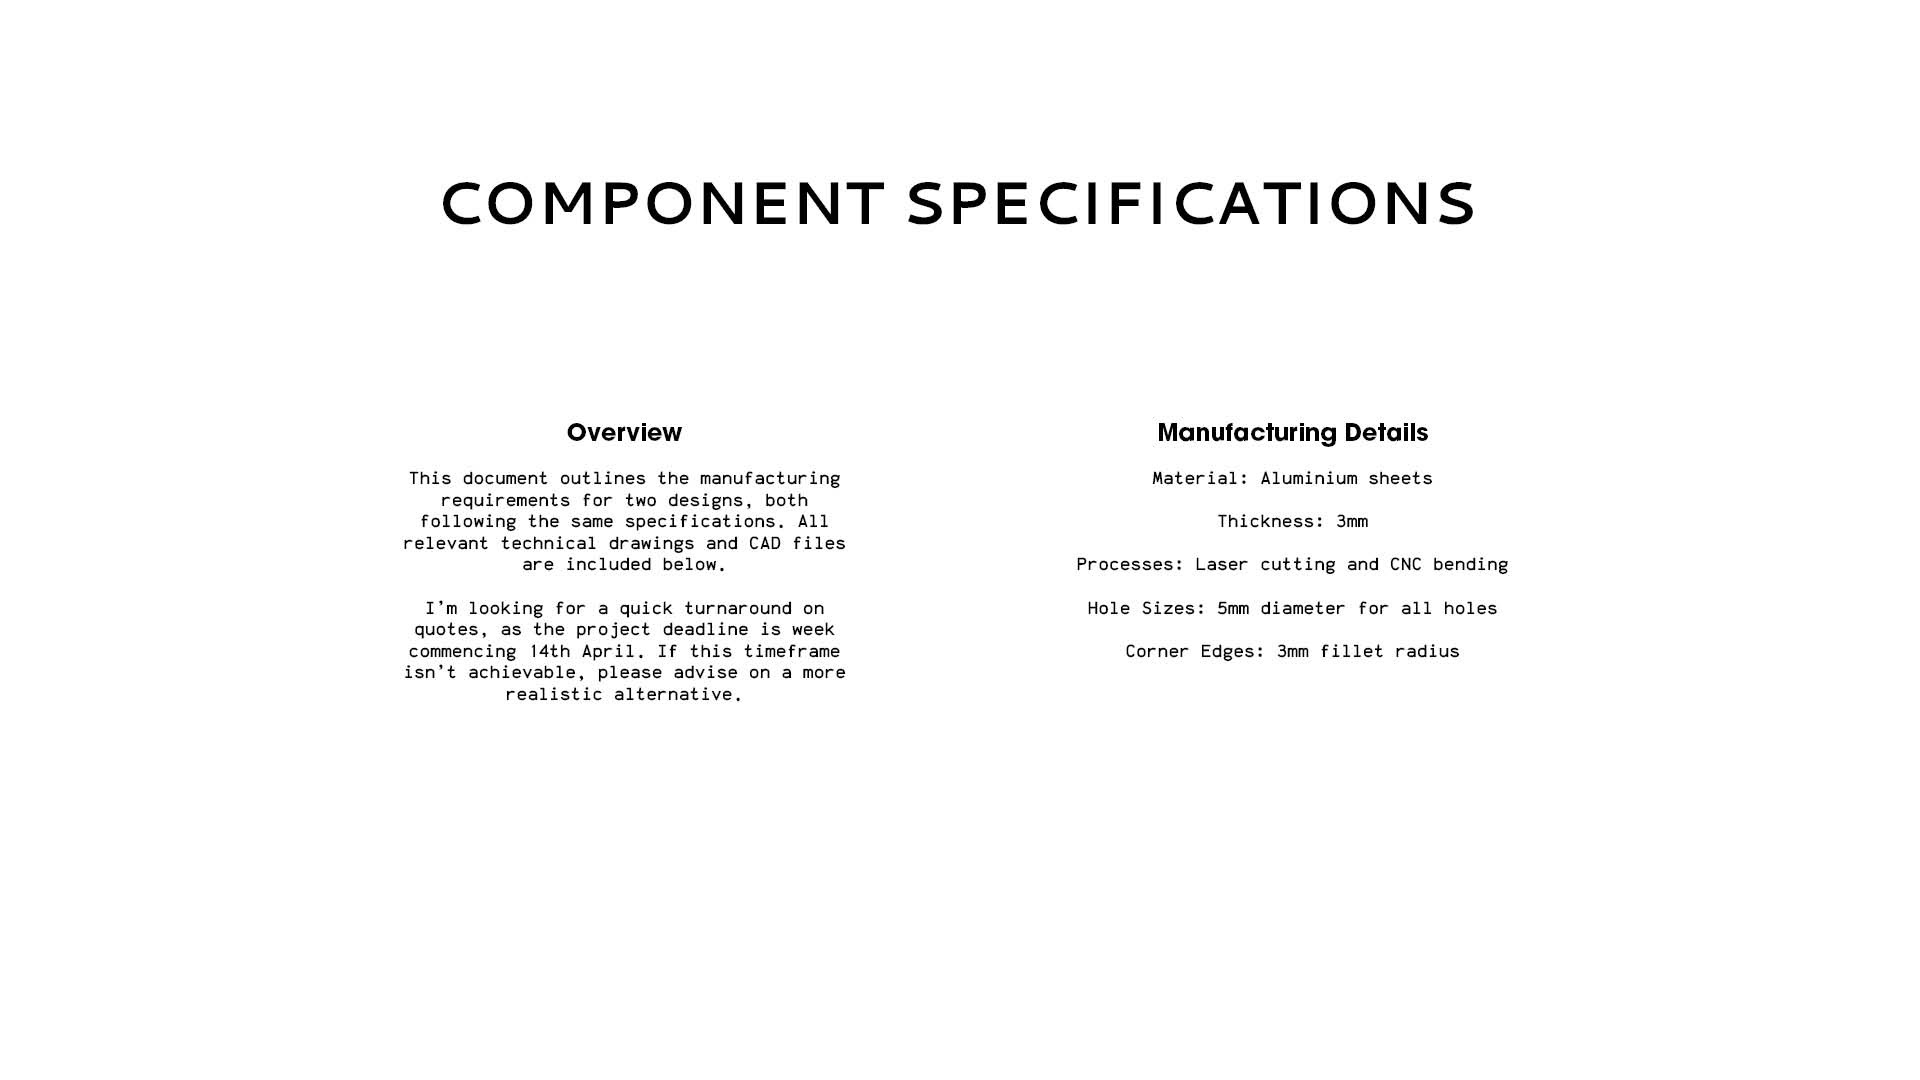
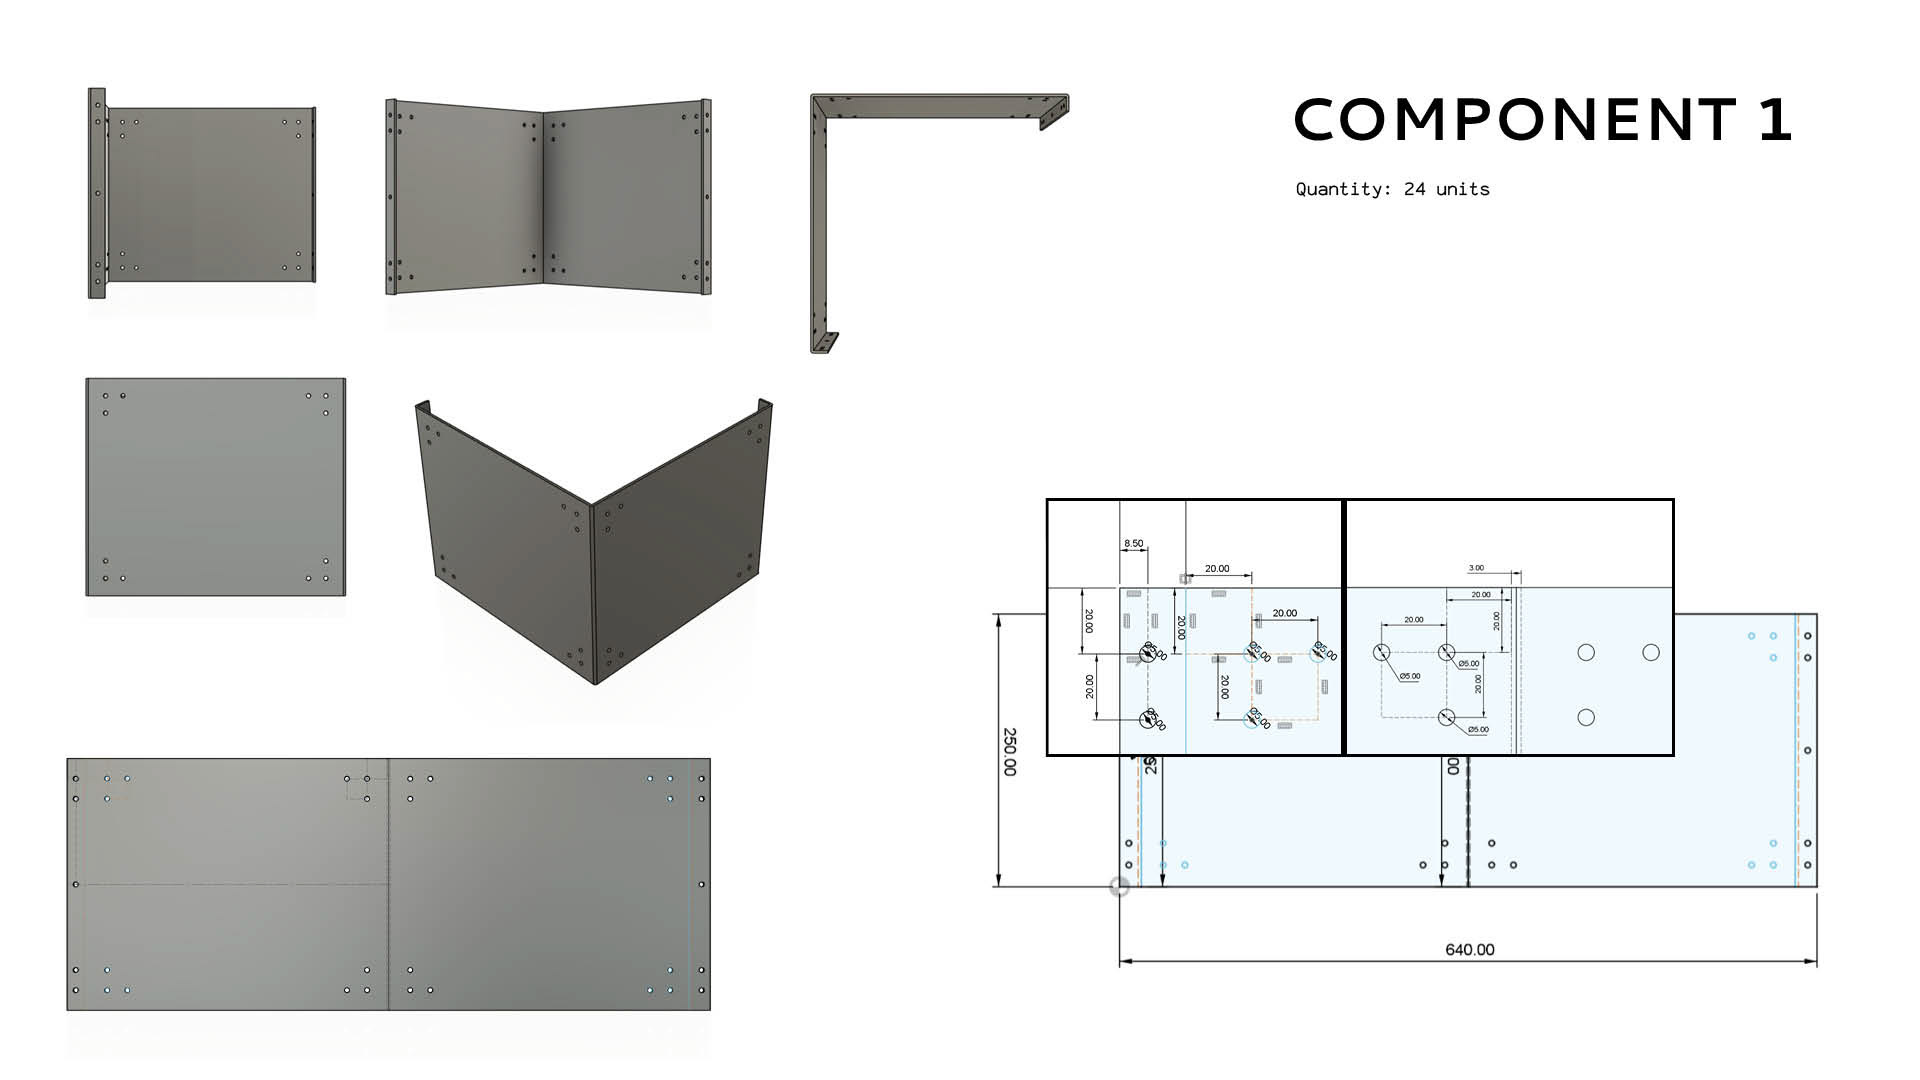

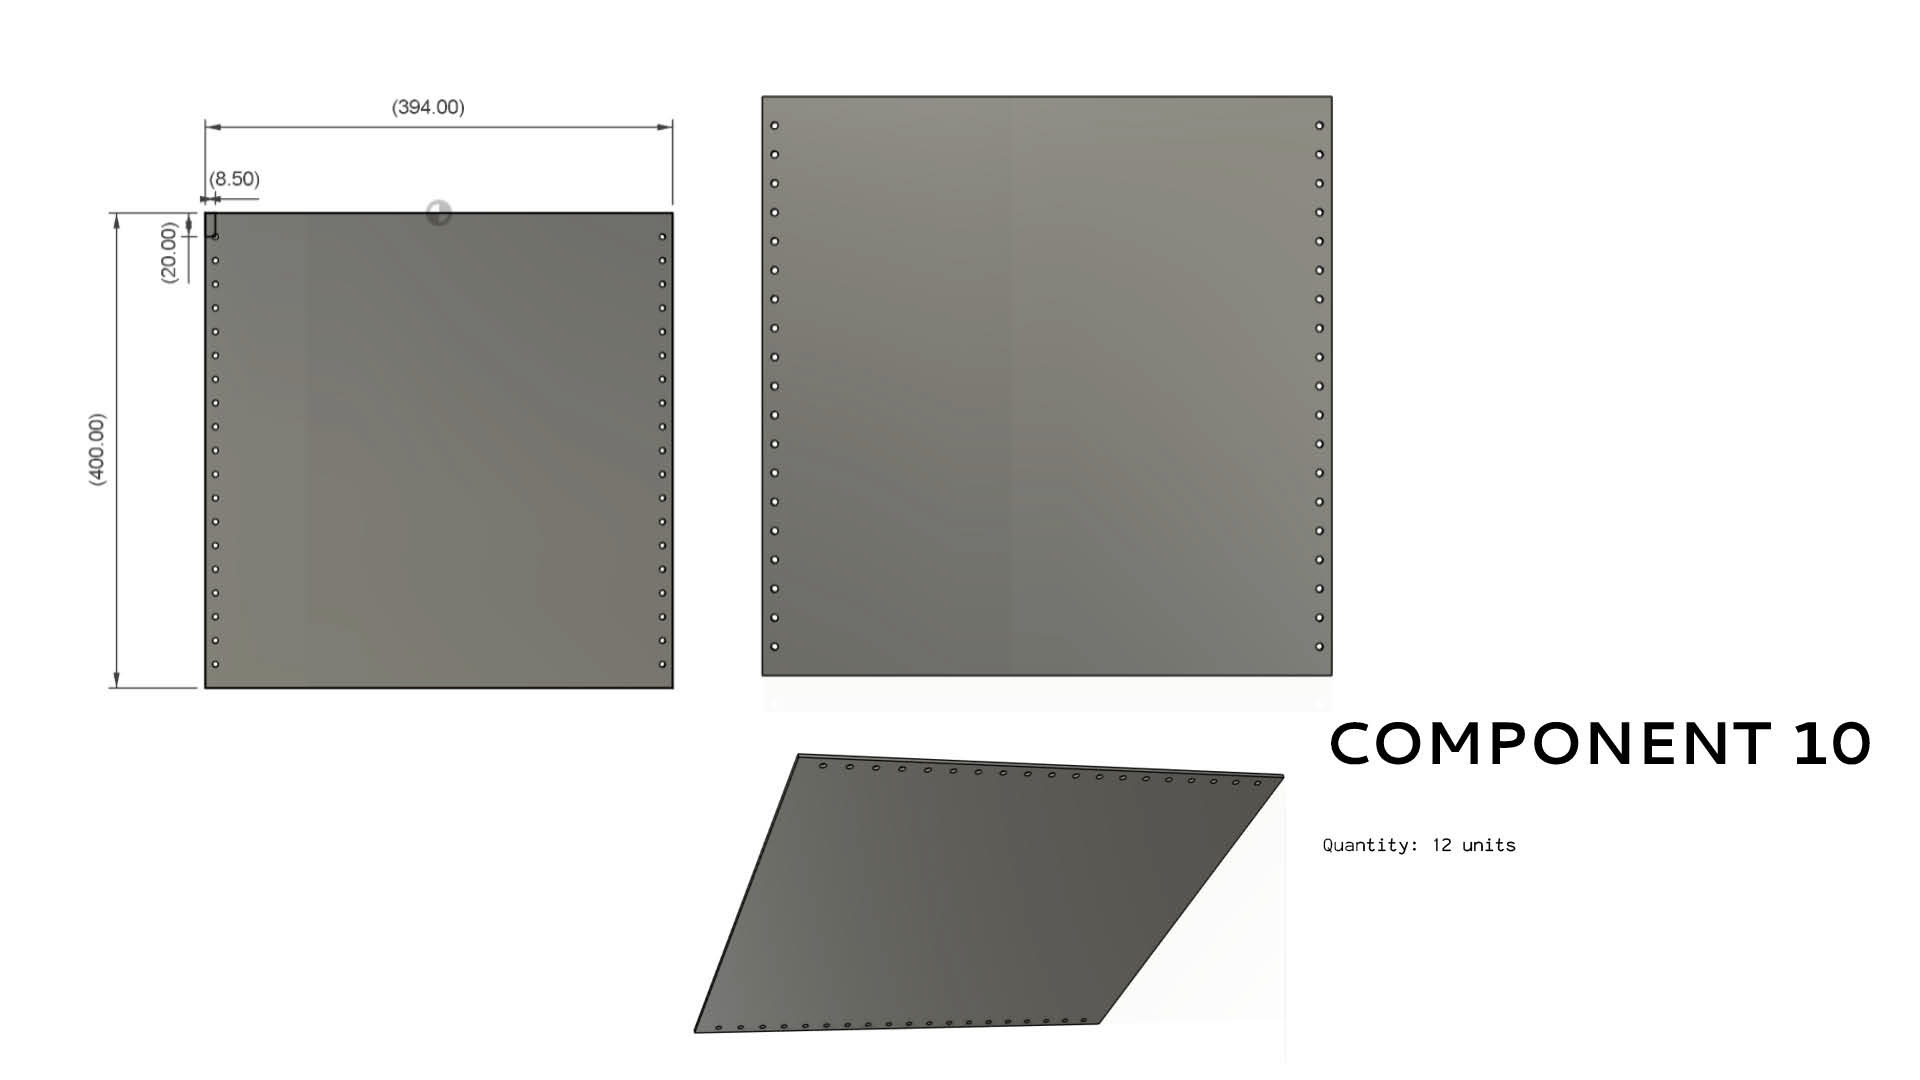
I didnt want to over complicate this document so i kept it simple with a breakdown of what it is, what each component looks like and how many of each component i need with some other additional measurments like material thickness just to make sure they use aluminium
Out of the 25 companies, only 6 replied. A few said they were too busy, others said they’d respond and didn’t. I followed up with phone calls to chase responses and made sure I spoke directly with each company that showed any interest. In hindsight, I’m glad I cast a wide net — and if I were to do this again, I’d message even more to increase my chances.
Some suppliers were large B2B-only manufacturers with £50,000 annual minimums, but I still contacted them to explore potential future business opportunities.
All Quotes
Design Development & Prototyping
Before reaching out to the manufacturers, I developed early prototypes through physical material sampling. I used the facilities and materials available in my university workshop, I spent roughly £60 on materials prototyping.
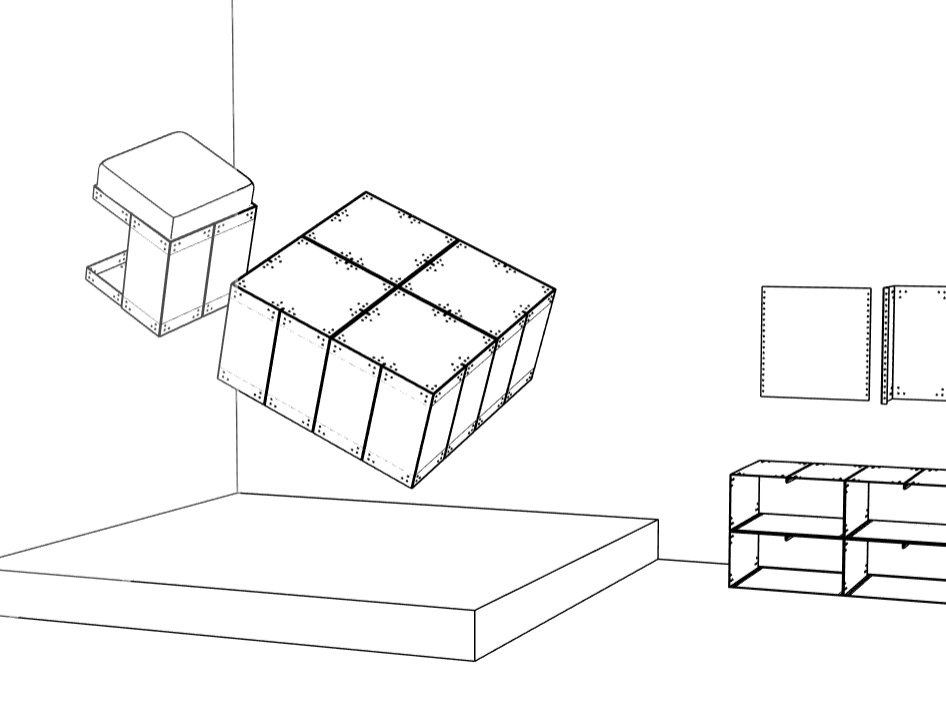
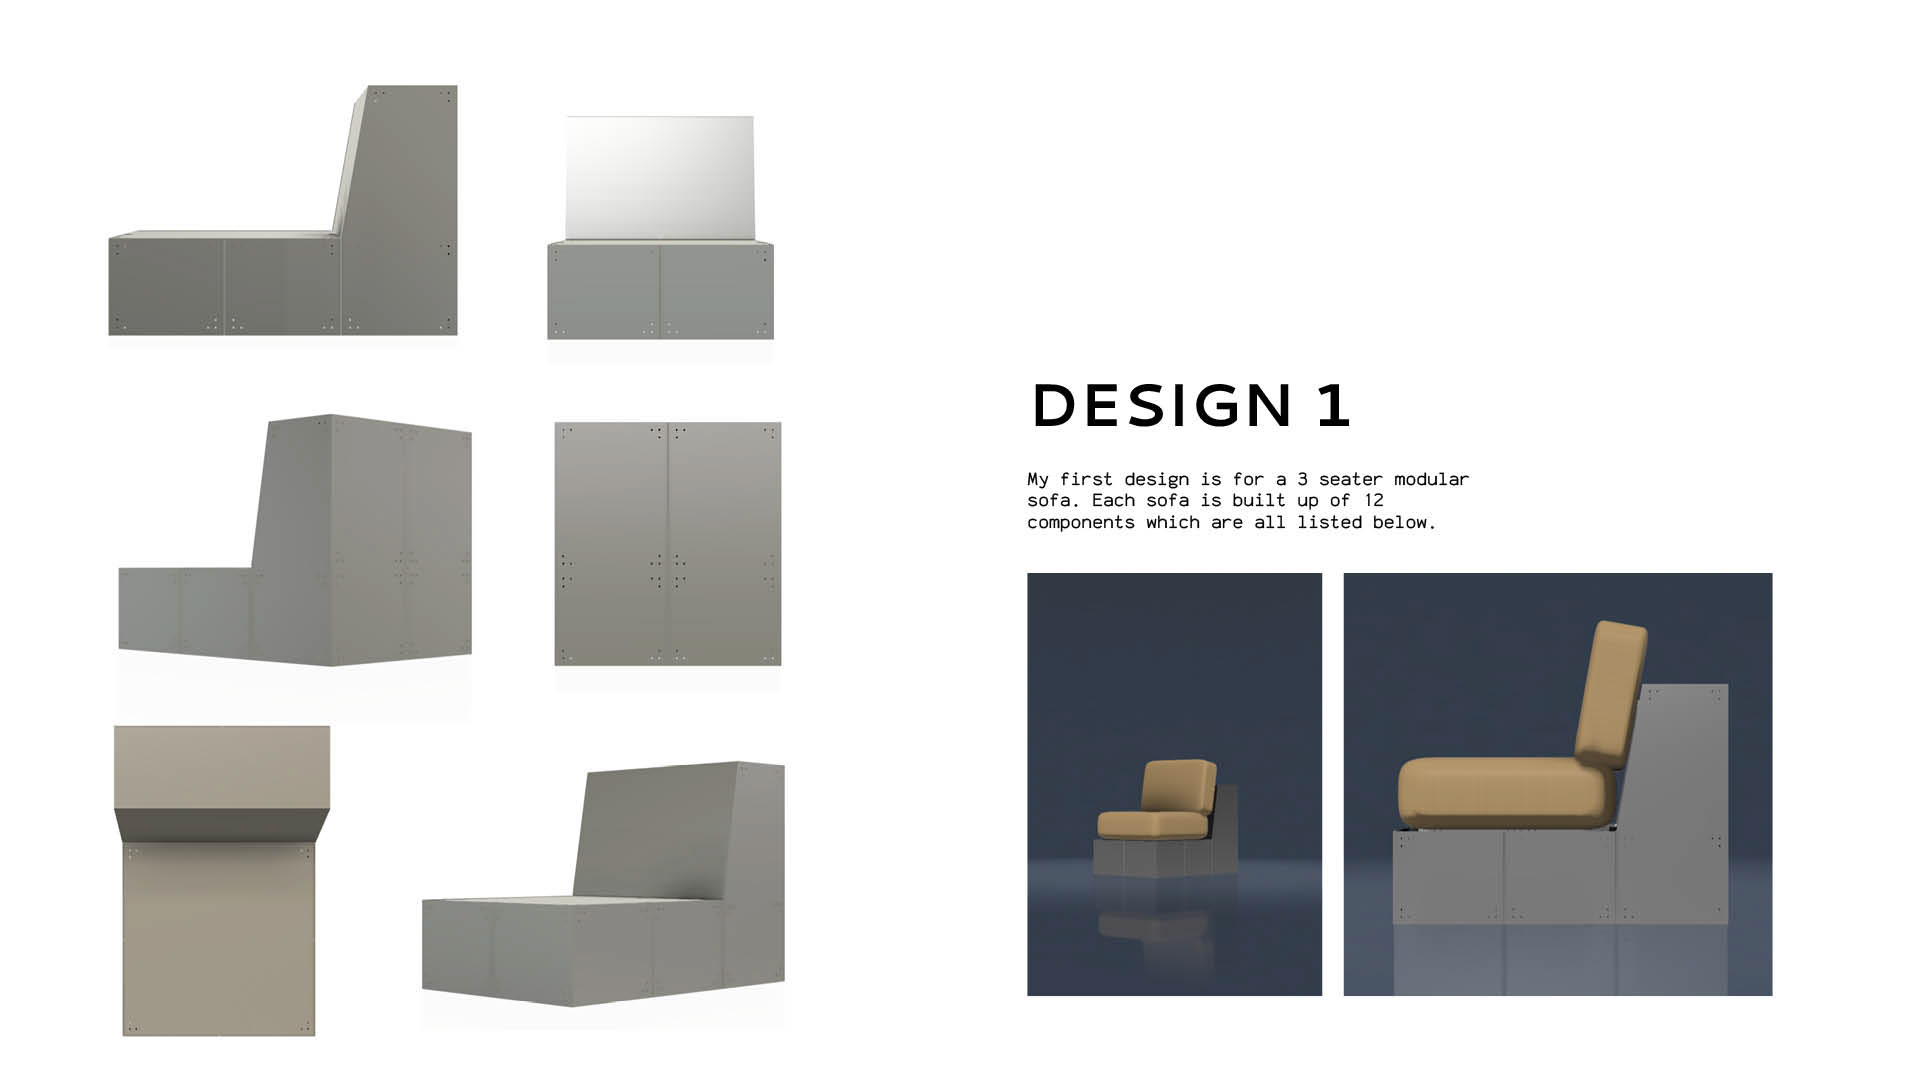
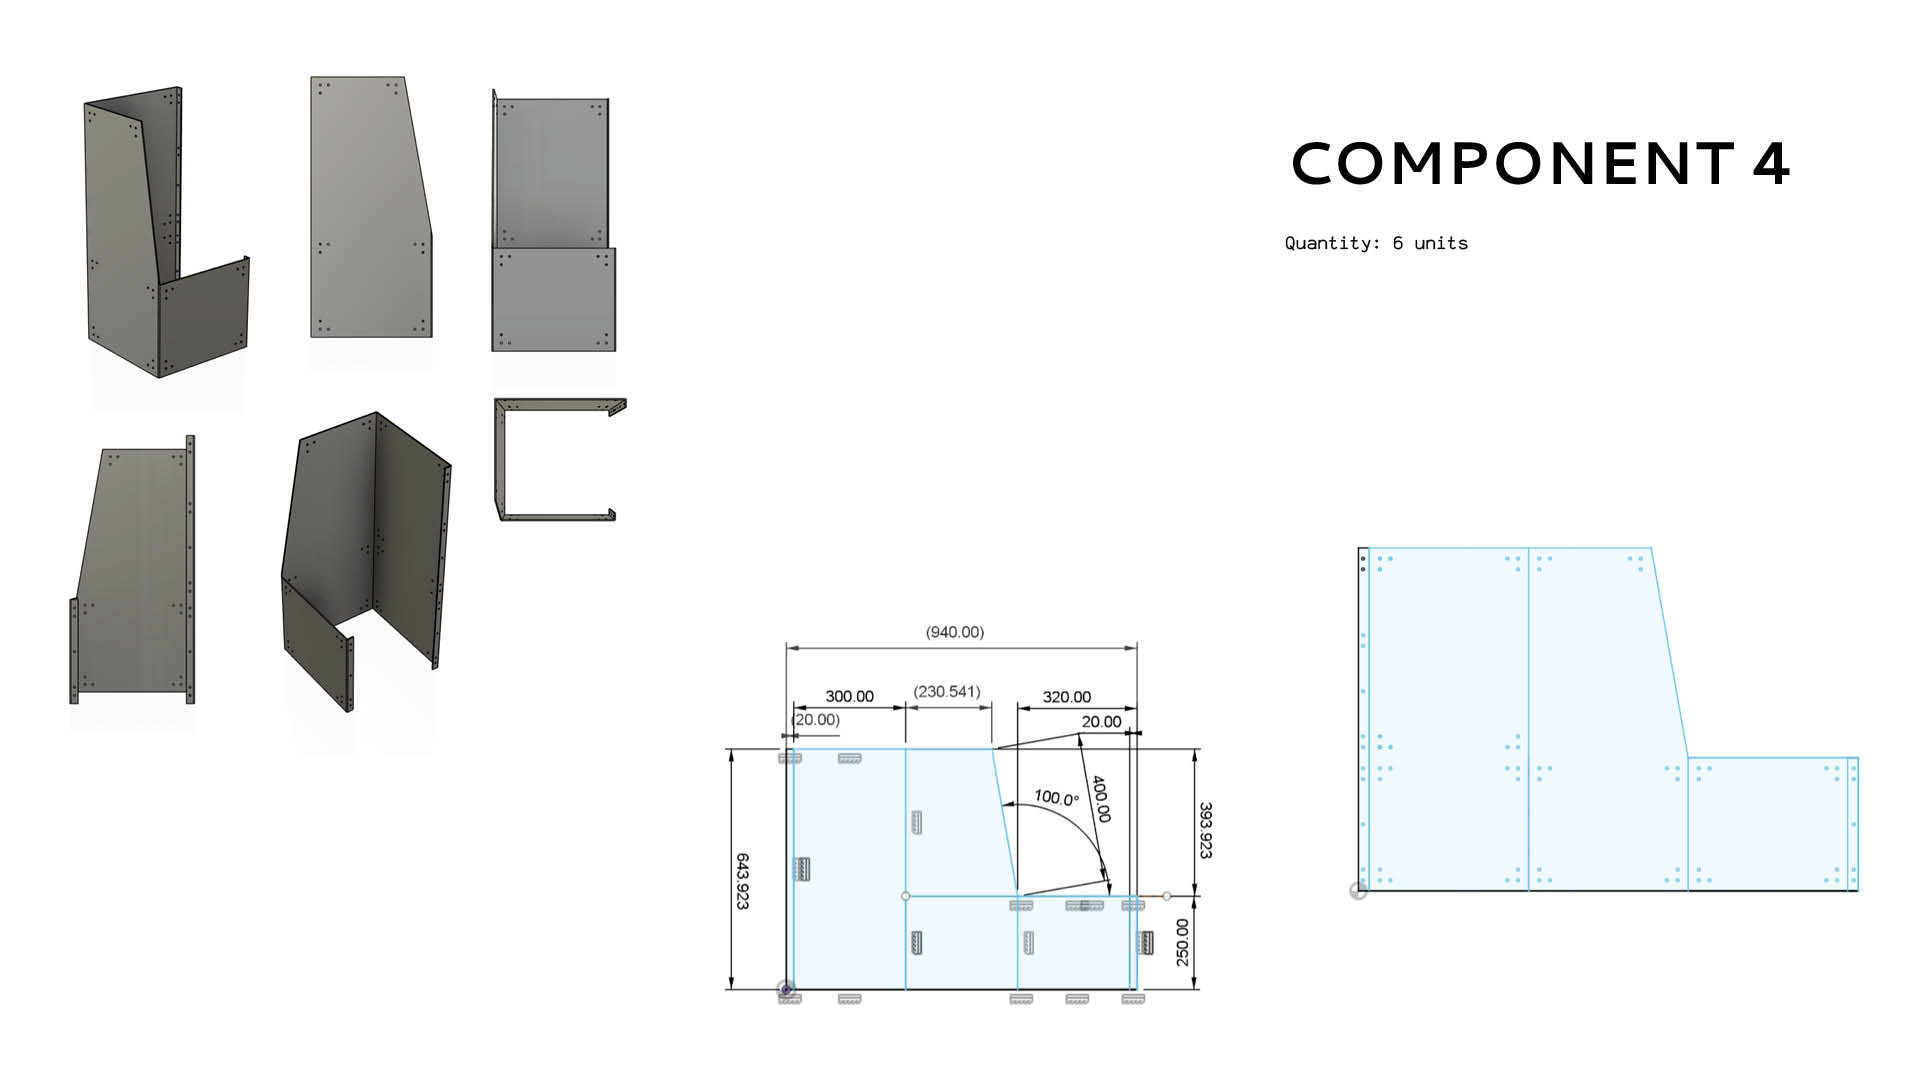
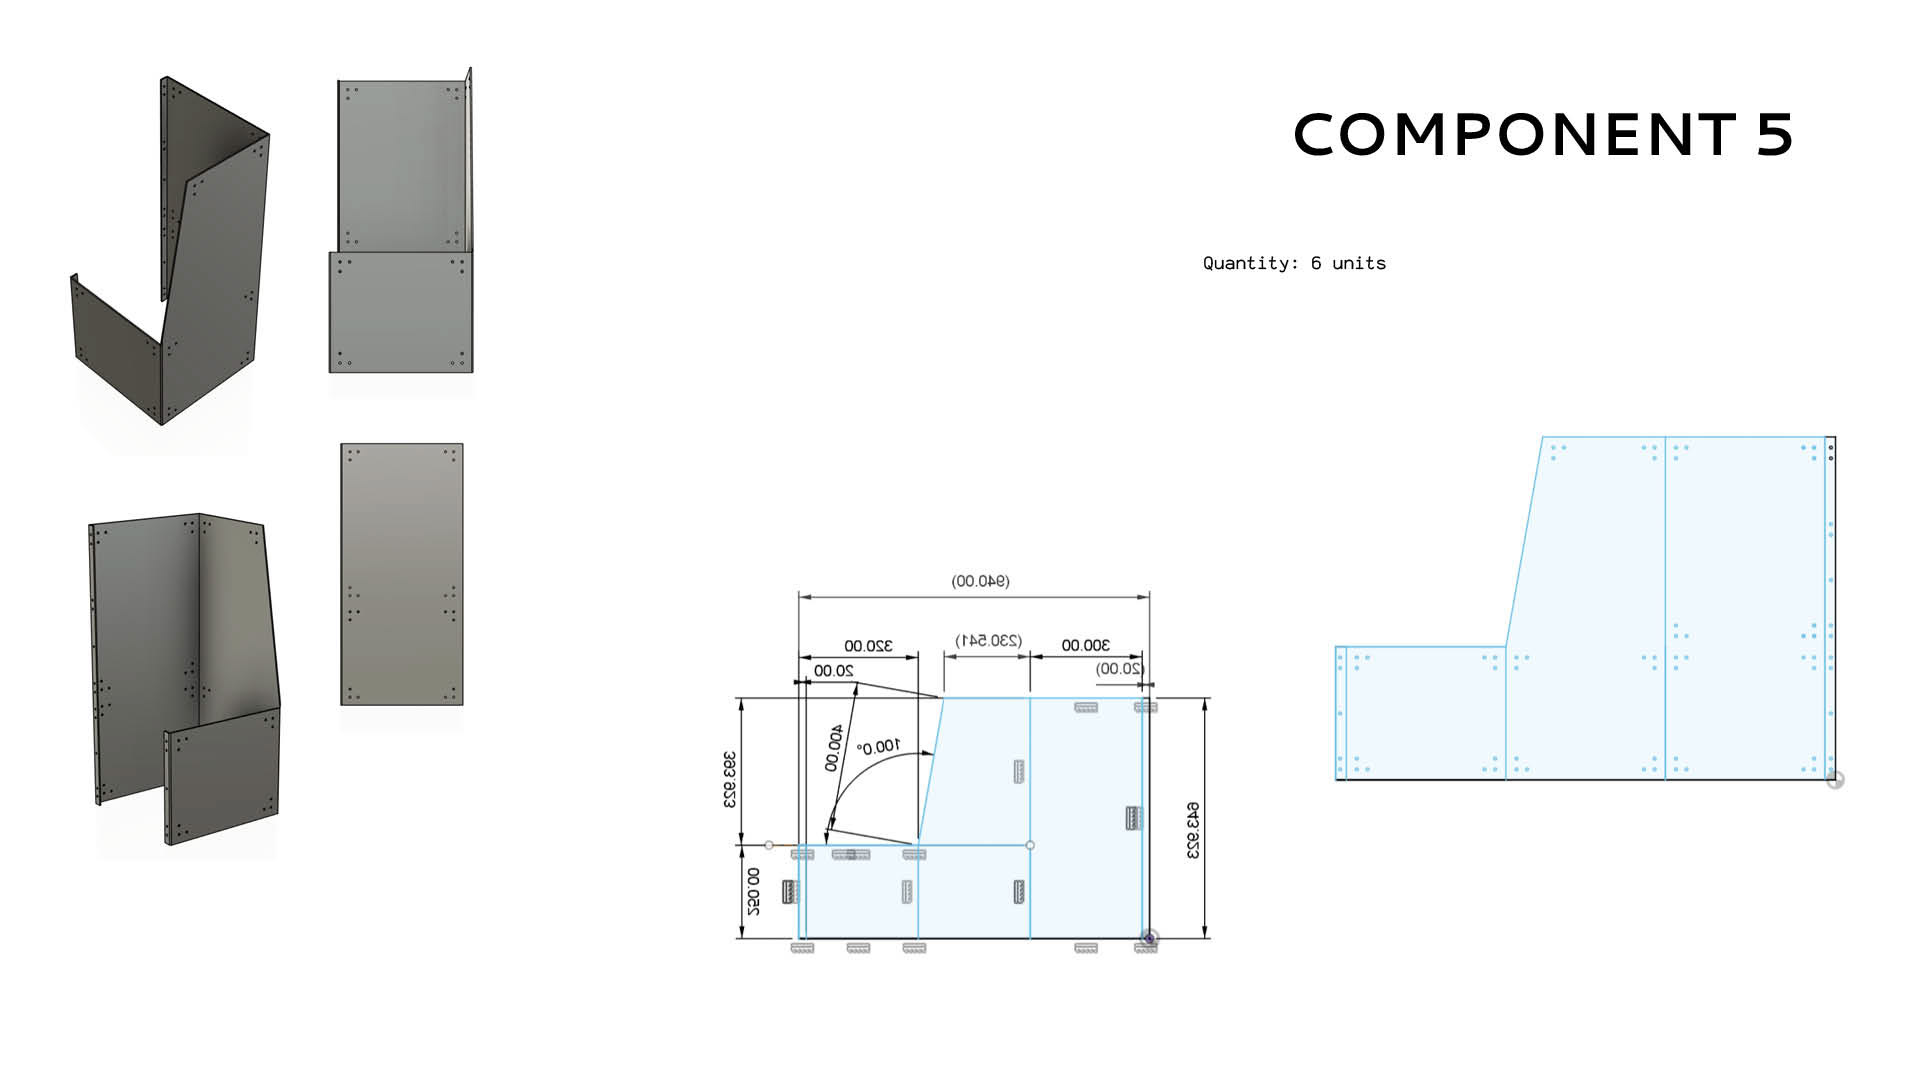
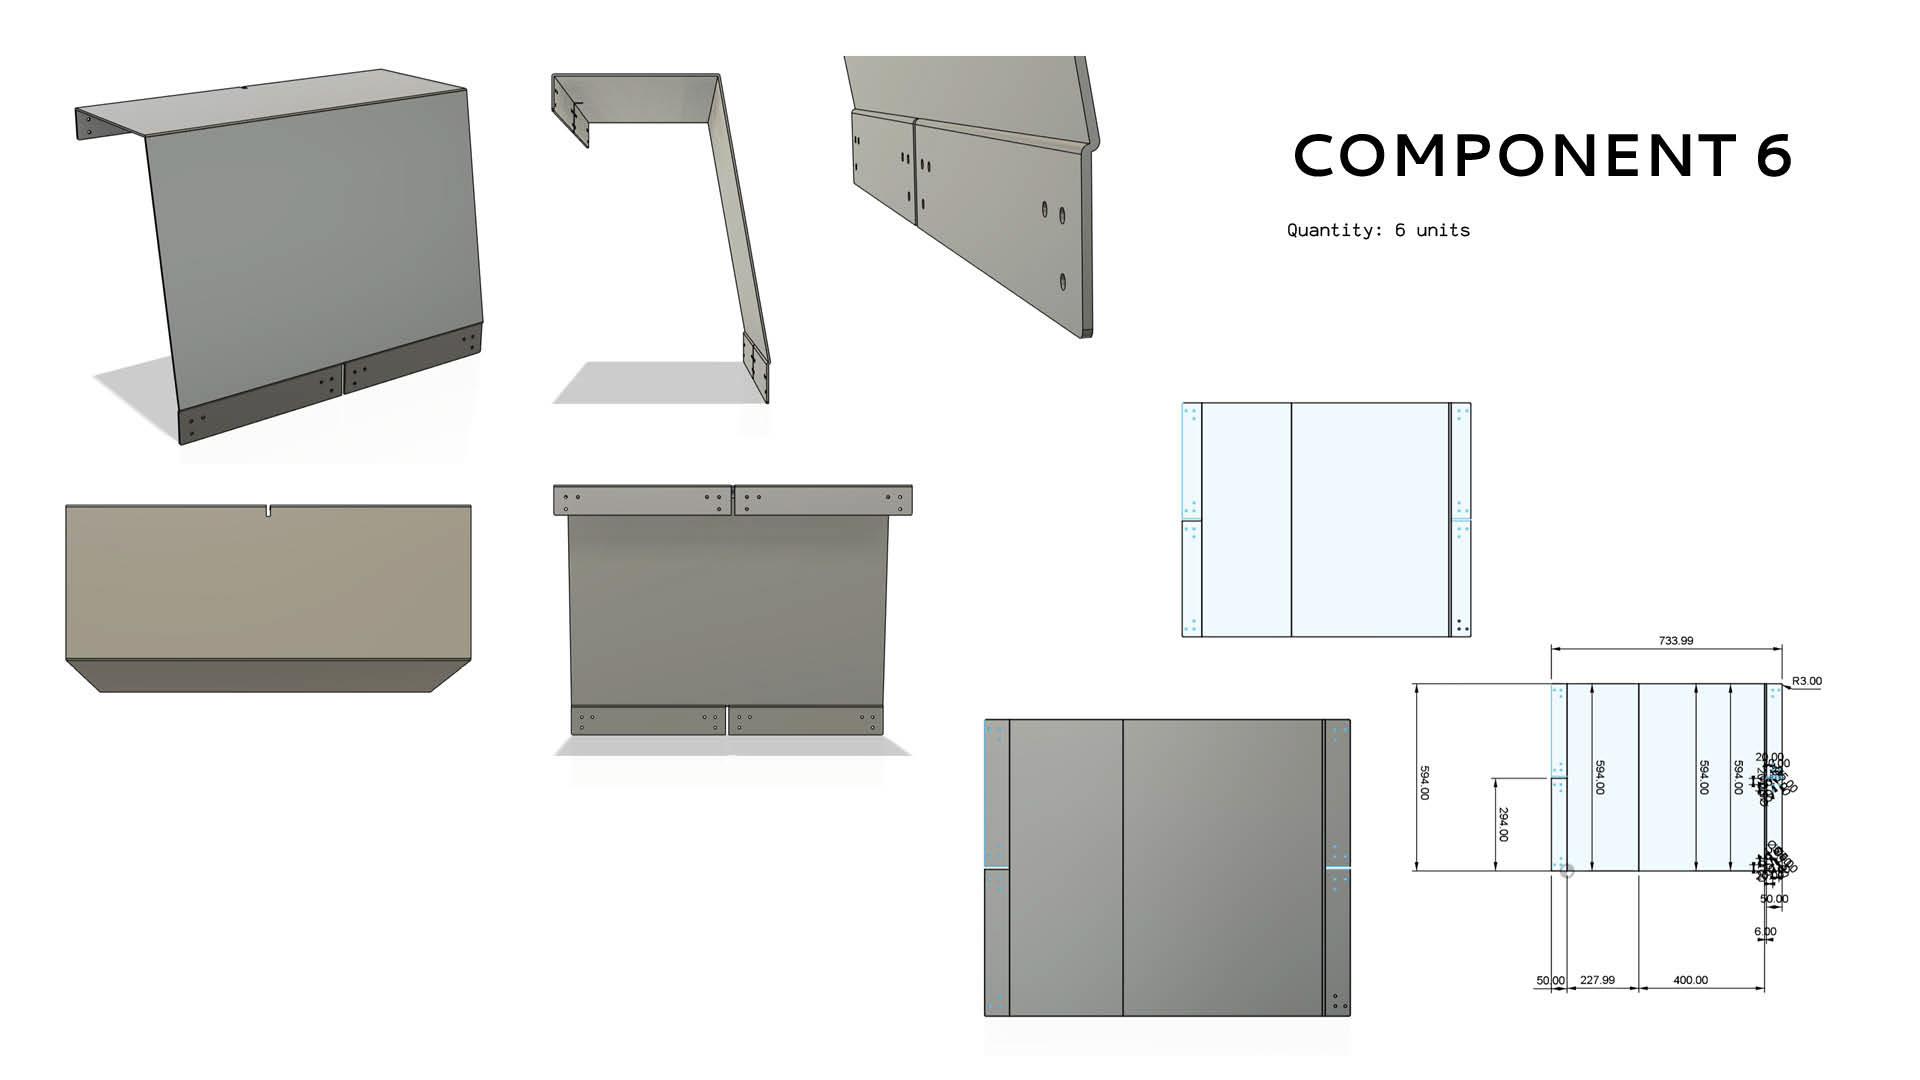
Alongside physical prototyping, I spent roughly 150 hours in Fusion 360 developing the final design, including two core products:
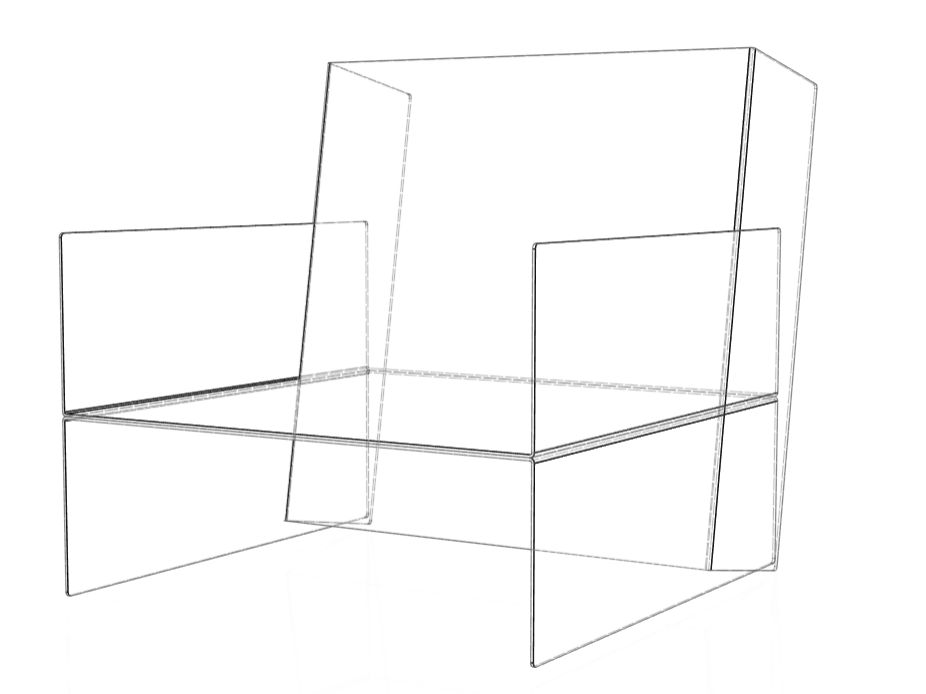
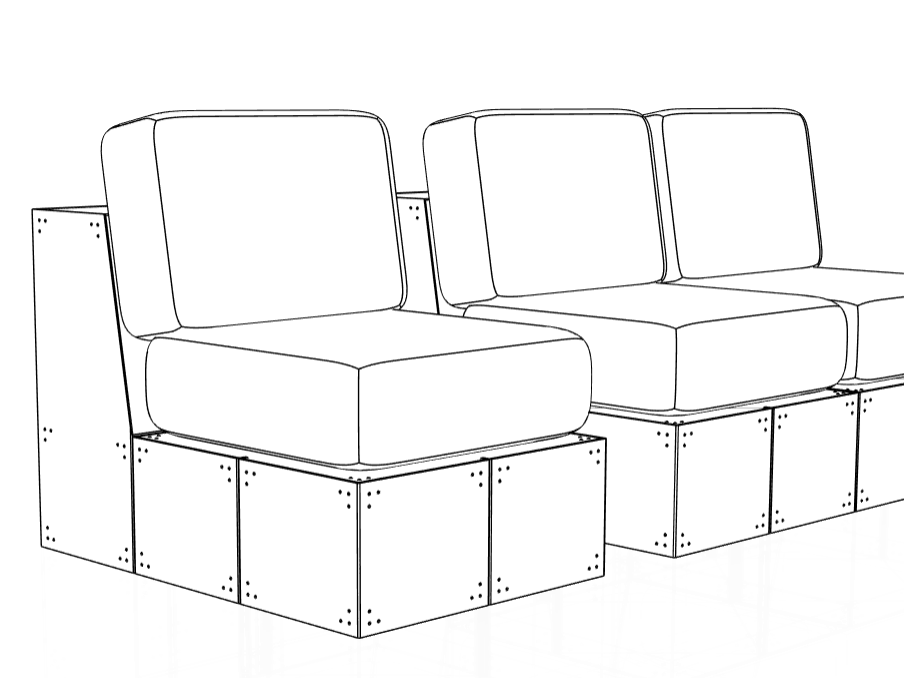
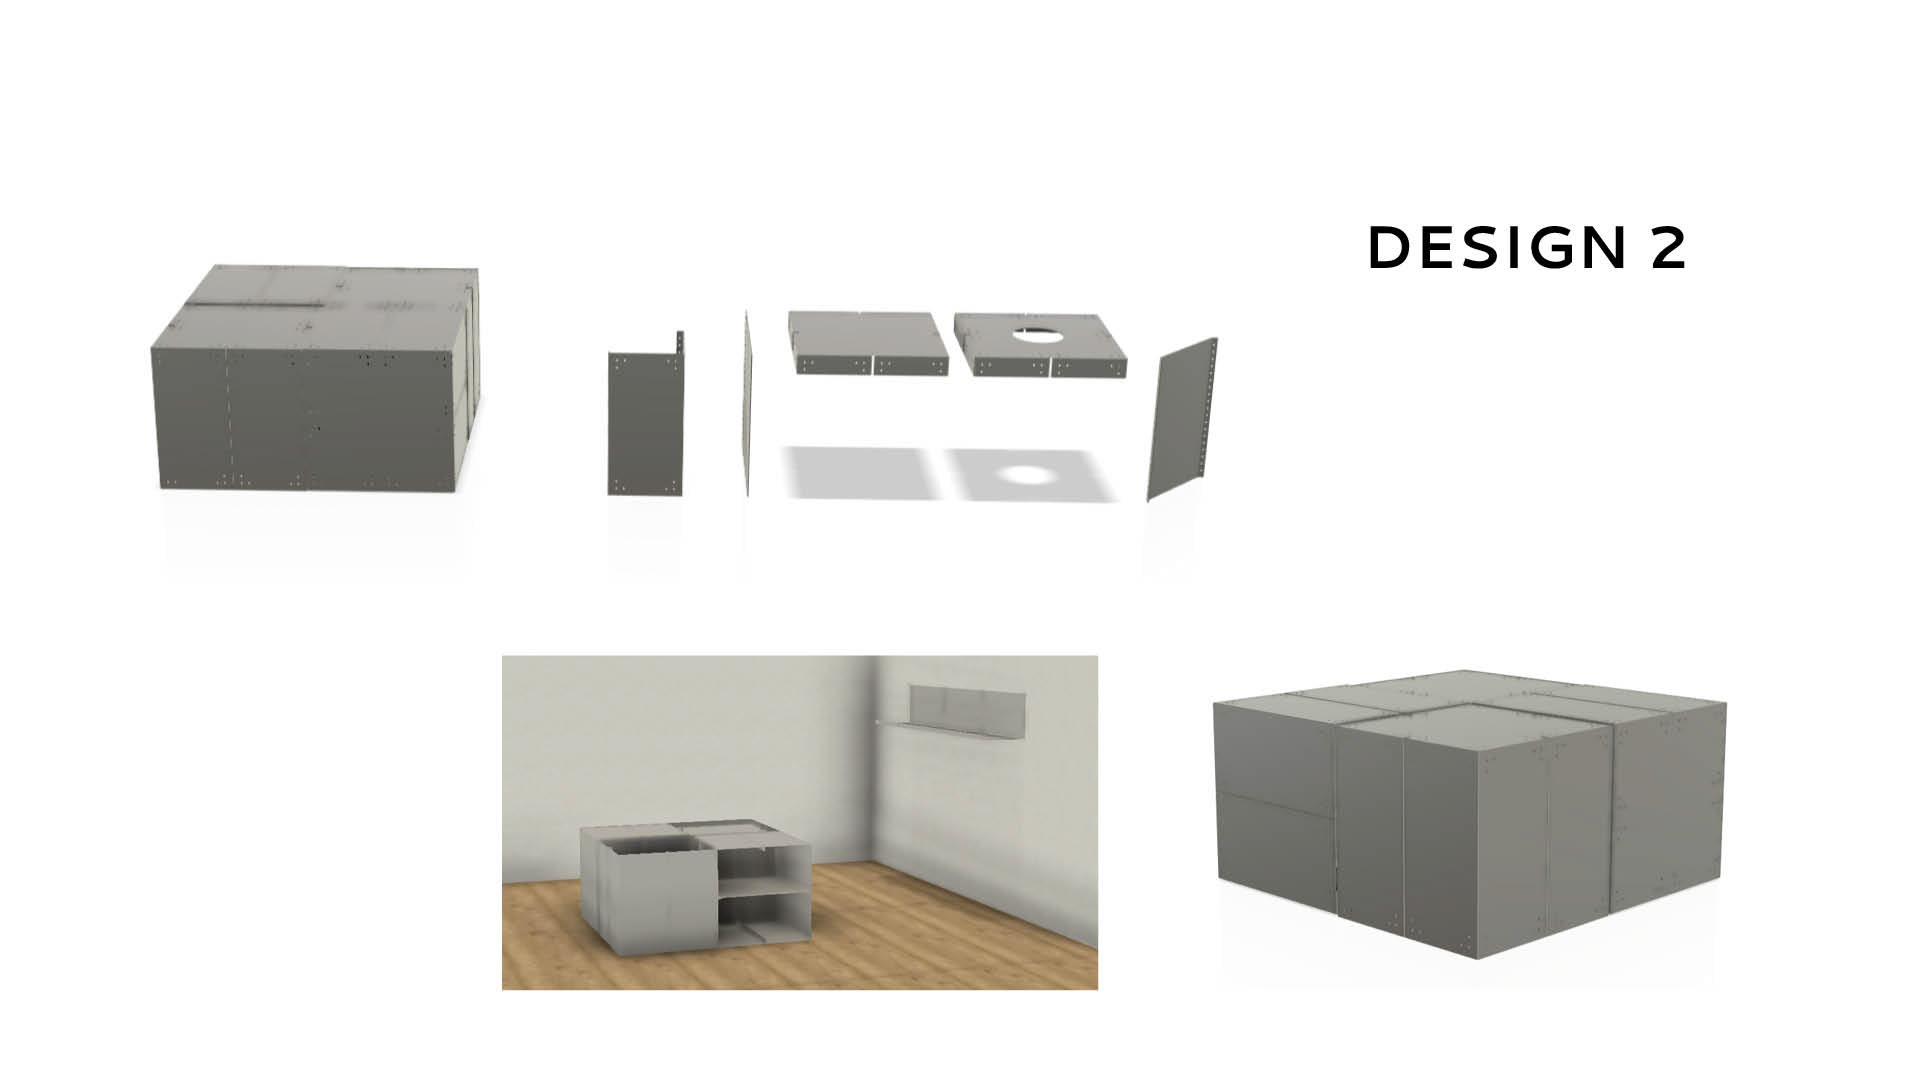
- A modular sofa seat (3 units make up a 3-seater)
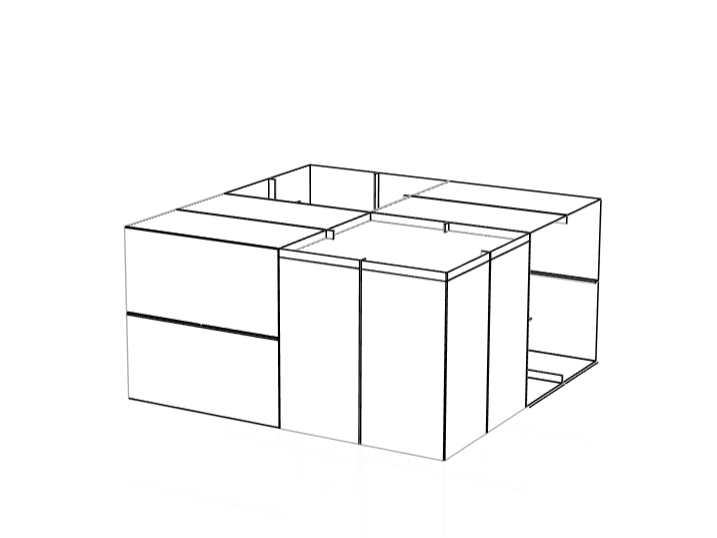
- A modular coffee table unit (built from 4 unique sub-components)
Over time, my designs evolved. During conversations with manufacturers, I received feedback and technical questions that helped me improve the CAD files. This required reworking files into different formats (like STEP or DXF) depending on the supplier — a logistical challenge I didn’t anticipate but adapted to.
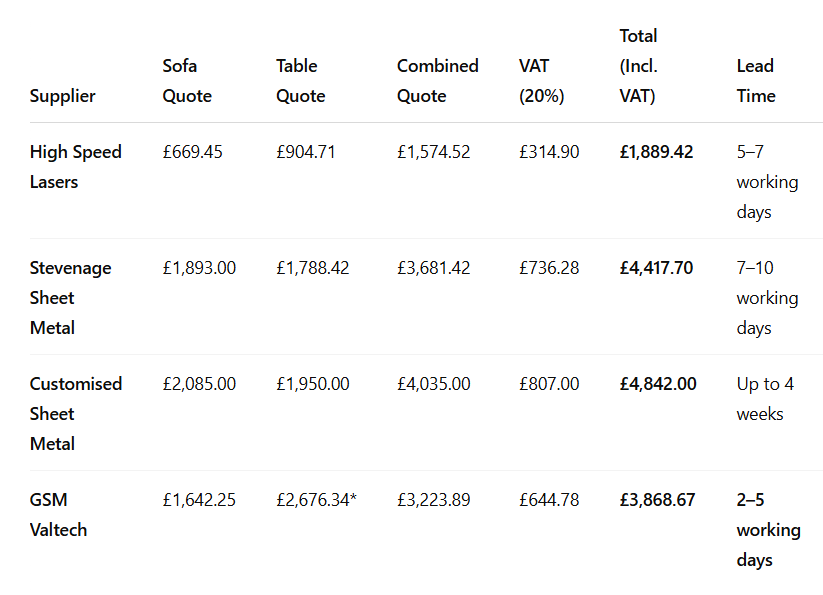
Supplier Quote Comparison
I asked each company to quote for:
- The sofa seat design only
- The coffee table design only
- A combined quote for both designs
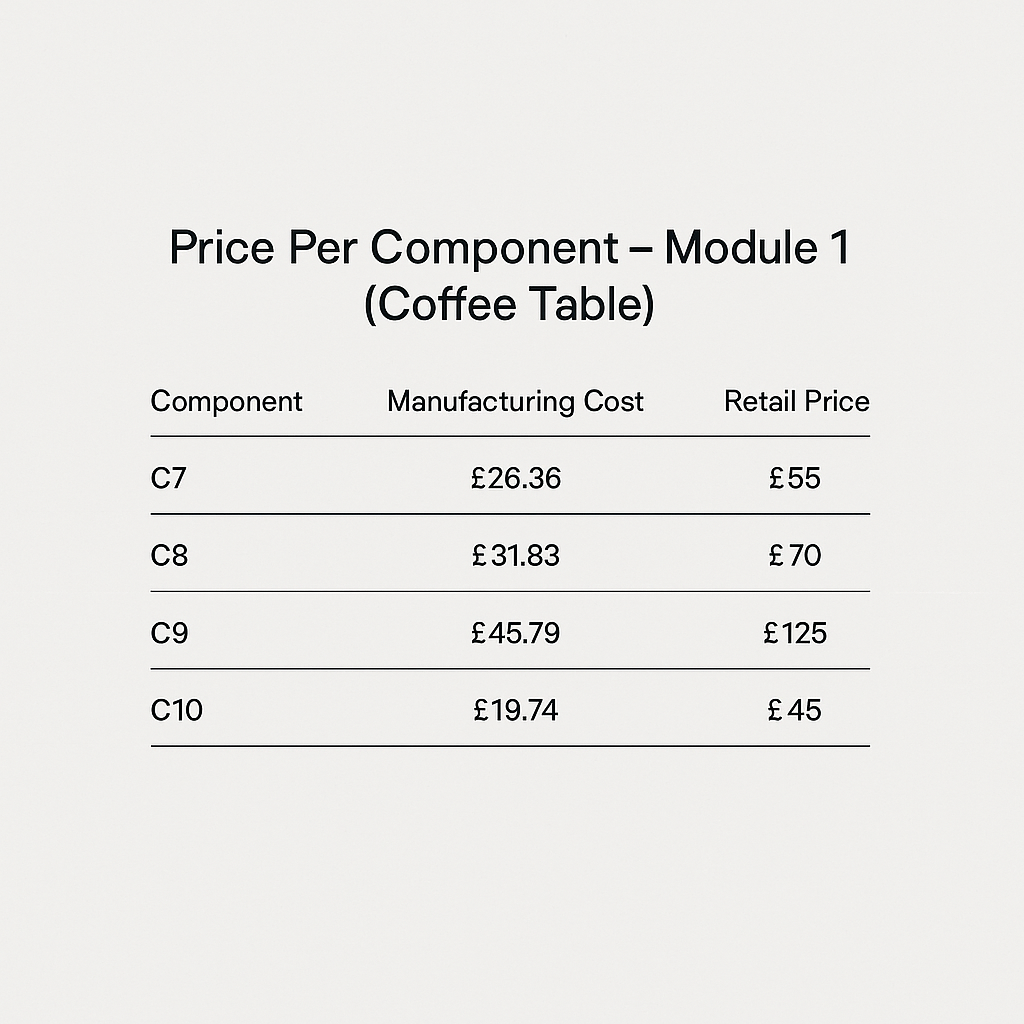
Below is a price comparison table for each individual component, based on the quotes I received:
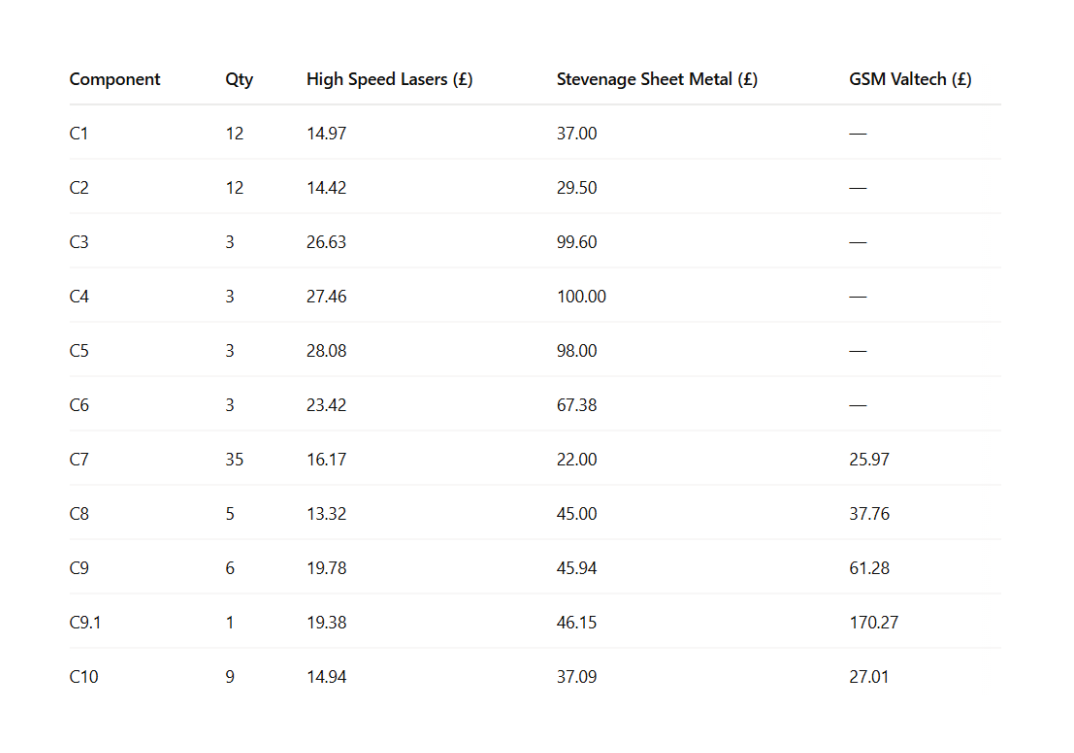
I only received 4 quotes by the time I needed to compare and decide which manufacturer I was to go with. Only 2 of those companies broke down the price per component for both designs. One company, as you can see, only gave me a price per component for design 2.
Despite not getting a price per component breakdown, I did receive more quotes for the lump sum of each job and a total quote for both. As you can see, there is one quote which came out significantly cheaper than the others. This came as a bit of a reality check, as I wasn't expecting it to cost so much. I understood that material and labor would come at a cost; however, I assumed, as the job was made up of fairly simple components, it wouldn't cost as much as it did.

HIGH SPEED
LASERS
Why I Chose HLS?
If it wasn't obvious already, I chose to go with HIGH SPEED LASERS.
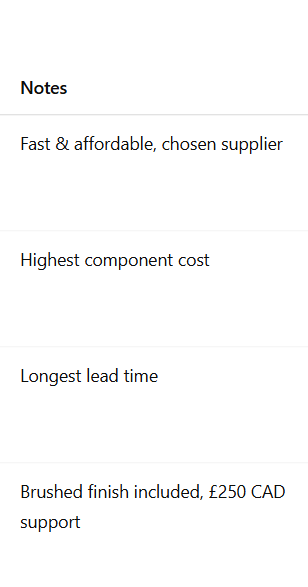
Not only were they almost £2,000 cheaper than the second-lowest quote, but they also promised to deliver on time. This wasn't the only reason for choosing HSL; another major reason I chose to work with them was because of how good their communication was throughout the whole quoting process. I was mainly in contact with Luke Taylor, who is the head of project quoting on their design team. Right from the start, he made the effort to really engage with my project, asking detailed questions about every aspect of the design — from hole positions and sheet thicknesses to bend angles and overall tolerances. Unlike a lot of other companies that gave fast, vague answers, Luke actually redrew all of my designs himself before even giving me a quote. He made sure that every measurement and specification was checked and confirmed before moving anything forward.
This careful back-and-forth process took almost two to three weeks to finalise, and they ended up being one of the last companies to get a quote back to me. Even though it slowed things down a bit, I was honestly happy to see that they were taking that level of care. It made me feel confident that they were treating my project seriously, not just rushing it through. That said, during those few weeks, I was definitely nervous — the other quotes I had received by then were looking very expensive and felt way out of reach for my original budget. I was really relieved when high-speed lasers finally came back with a price that not only made my project achievable but also made me feel like I hadn't compromised on quality or detail.
Choosing HLS also allowed me to sneakily use the vertical gallery budget to cover my entire project. It was something I was very apprehensive about, as they had commissioned me for just the sofa; however, I had a budget and managed to make it stretch across both projects. If I were just to have used the budget on the sofa commission, I would have chosen GSM Valtech, as they offered the brushed finish, which worked out to £1975 (inc. VAT) just for the sofa alone. This would have been more expensive, and I would have only covered the cost for one of my projects. I know technically I shouldn't have done this and will make sure to not do this in the future, but it was advised I do, and one of the only reasons I applied to the vertical gallery.
TIME & ADDITIONAL COSTS
When working out the final cost of my pieces, it wasn’t just about how much it cost to manufacture — I also had to factor in all the time and additional expenses that went into developing the project from start to finish. This was the first time I had ever gone through a full manufacturing process like this, so naturally it took longer than it probably would if I were to do it again now with the experience I’ve gained. I also had the benefit of using university resources for free, like software and workshop space, but if I was to produce these pieces commercially after uni, those costs would need to be factored in properly.
Time Spent
Design Development: Around 200 hours spent designing across different stages, including prototyping, CAD modelling, and revising designs based on manufacturer feedback.
Manufacturer Management: Roughly 15 hours spent emailing, calling, and following up with suppliers to secure quotes and answer technical questions.
Assembly & Marketing: Around 3 hours allocated for final assembly, filming, and preparing marketing material.
If I were to make these products again, I know I could streamline this whole process massively. With the skills, contacts, and experience I now have, I reckon I could redesign and get new quotes in closer to 80 hours instead of 200.
Additional Costs
Prototyping Materials:
Around £60, which I personally funded to create physical material samples and mock-ups.
Software Licenses (future commercial use):
Autodesk Fusion 360 Commercial License: £462 per year
Adobe Creative Cloud Suite: £785.88 per year (excl. VAT)
Although I currently have free access to these through my university, if I continue this work after graduating, I would need to invest in these licenses myself. Because of that, I’ve included them in my overall business cost planning.
ALL OF THIS INFORMATION ABOVE IS TARGETED AT MY COFFEE TABLE AS I HAVEN'T COUNTED COSTS FOR UPHOLSTERY FABRIC AND FOAMS ETC.
Hardware Costs
Firstly, I needed to break down how many bolts I needed for each piece I built.
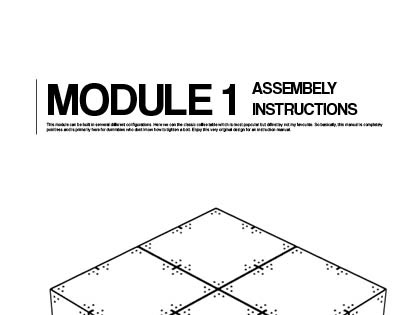
Module 1 - coffee table = 112 screws
Module 2 - shelving unit = 80 screws
Module 3 - sofa seats = 90 screws
I found that I needed a few different sizes of screws. I had already determined that they all needed to be M5, as I had all of my holes cut to 5mm, but I needed some different lengths.
I needed a total of:
182 - 6mm (M5 Barrel screws)
24 - 9mm (M5 Barrel screws)
76 - 12mm (M5 Barrel screws)
This part was a bit awkward, as I had already noticed that the screws I wanted were on the pricier side.
While searching, I couldn’t find any 9mm M5 barrel screws — I came across 6mm, 10mm, and 12mm, but 9mm just didn’t seem to exist anywhere. I realized I’d either need to get them custom-manufactured or use washers to make up the difference.
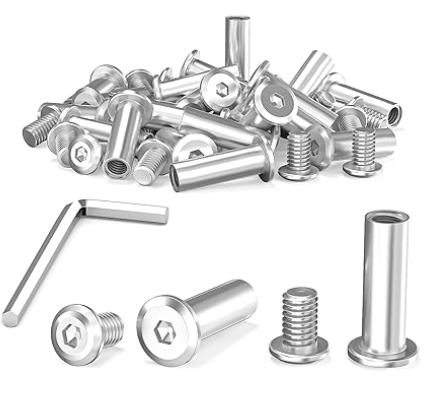
I actually found it quite difficult to decide which hardware to go with. I had always wanted to use the barrel screws shown below, but they ended up being significantly more expensive than other bolt options. I explored a few alternatives, as you can see, but my main requirements stayed the same: the hardware needed to be user-friendly (no specialist tools required) and visually clean from the outside.
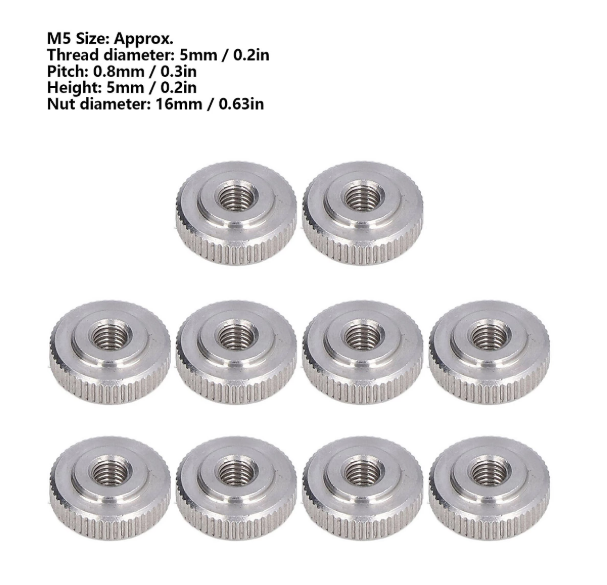
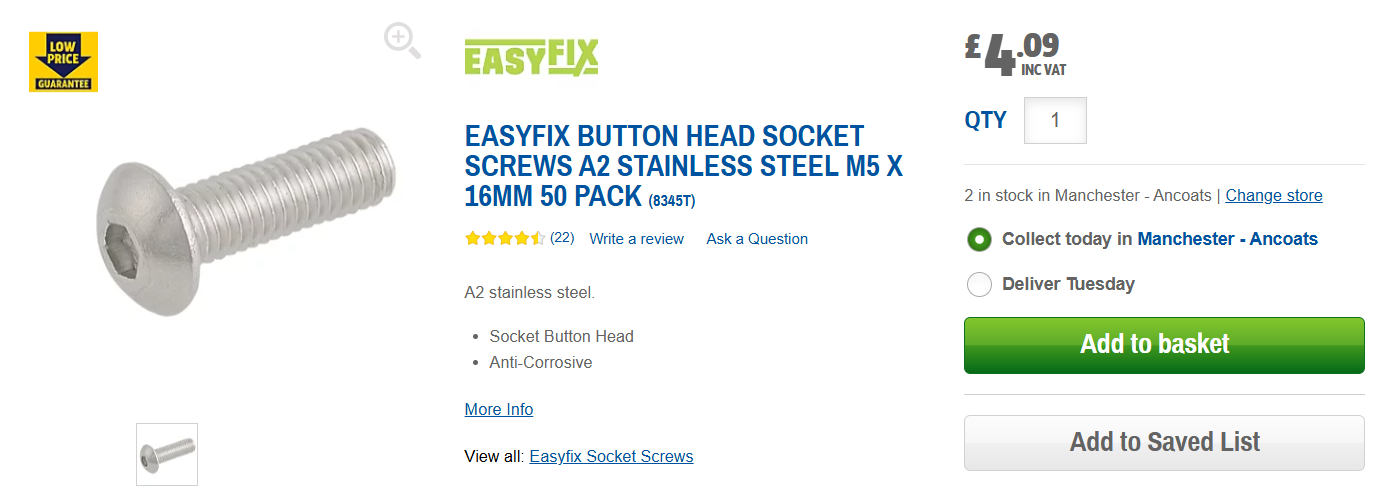
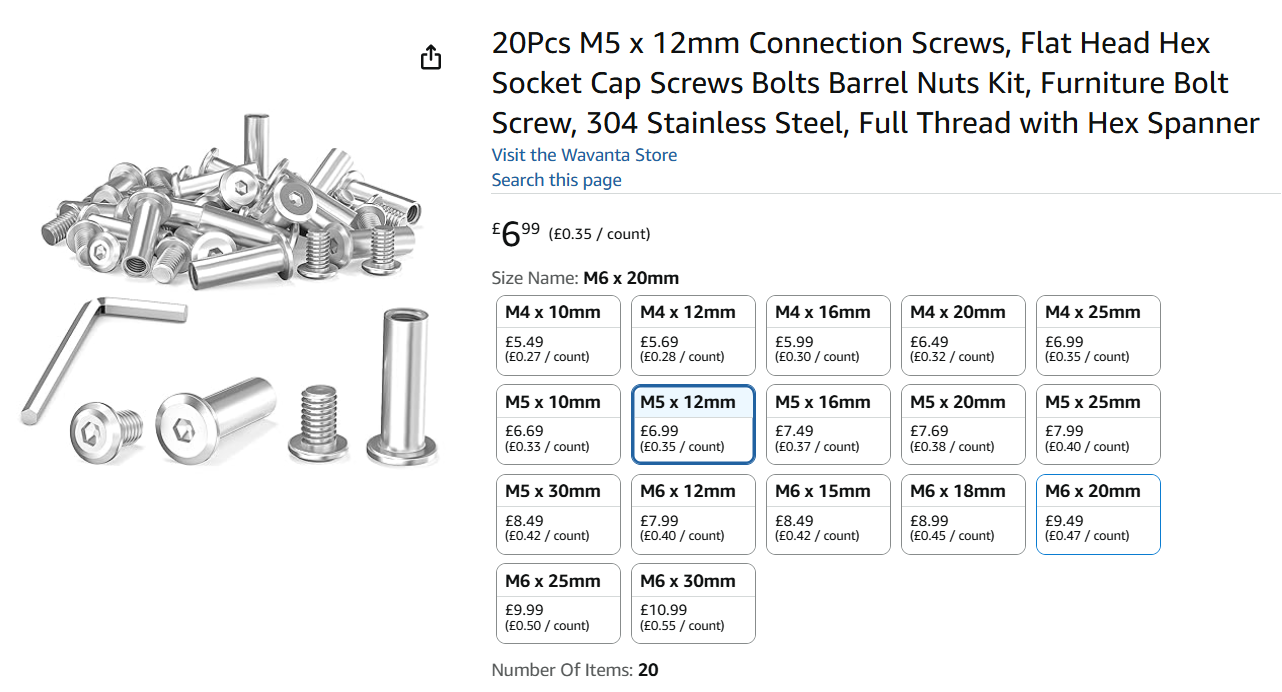
These ended up being the best options I could find. I initially considered using thumb nuts, as they seemed like a simple and fun way to connect the components. However, I realised they might not provide the tightness needed for a secure fit. I also found some button head bolts, which looked clean and would function well from the outside.
The other option was to commit to the screws I had wanted to use from the beginning. I decided to go with these, but ran into one major issue — they were only available in 10mm or 12mm lengths for M5 sizes. I searched through multiple suppliers but couldn’t find anything smaller in that style at a reasonable price.
In the end, I bought 300 12mm screws. I made the decision to cover the cost myself, as I’d already used a fair amount of university funding for other parts of the project. Given the scale of the work, it felt like a small personal investment. I chose not to claim this back through the Vertical Gallery, since I knew they had already contributed enough.
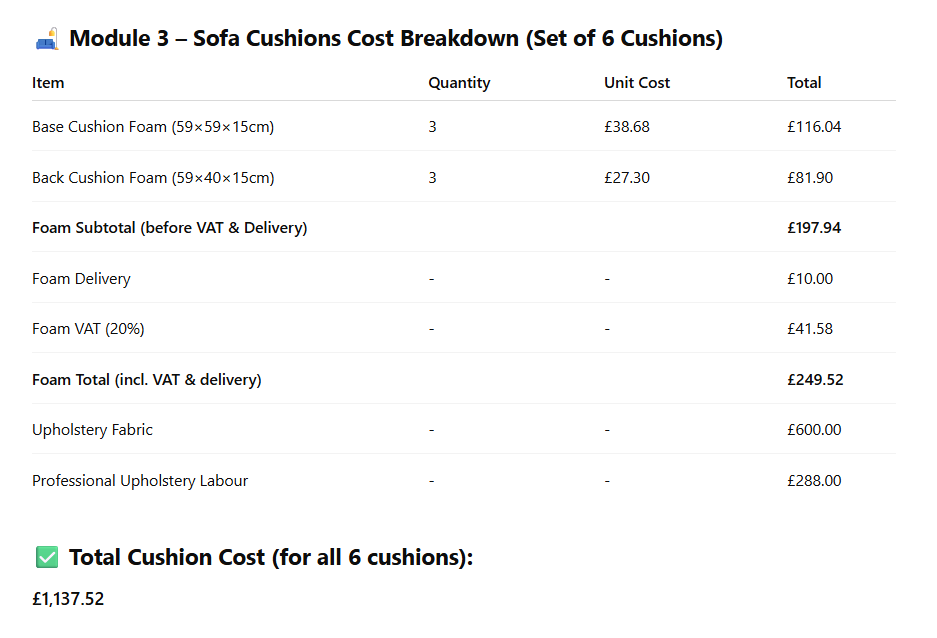
CUSHION COSTS
This is a cost breakdown of the cushions for our sofa. This includes material costs and professional upholstery labour costs.
FOAM COSTS
I looked at multiple websites for foam, but FoamDirect stood out as the best option. They offered custom cut-to-size foam, and also provided matching Dacron and stockinette wraps tailored to those dimensions — all without being much more expensive than other suppliers. They also had a wide variety of foam types to choose from and even recommended specific options based on intended use, which made the process a lot easier.
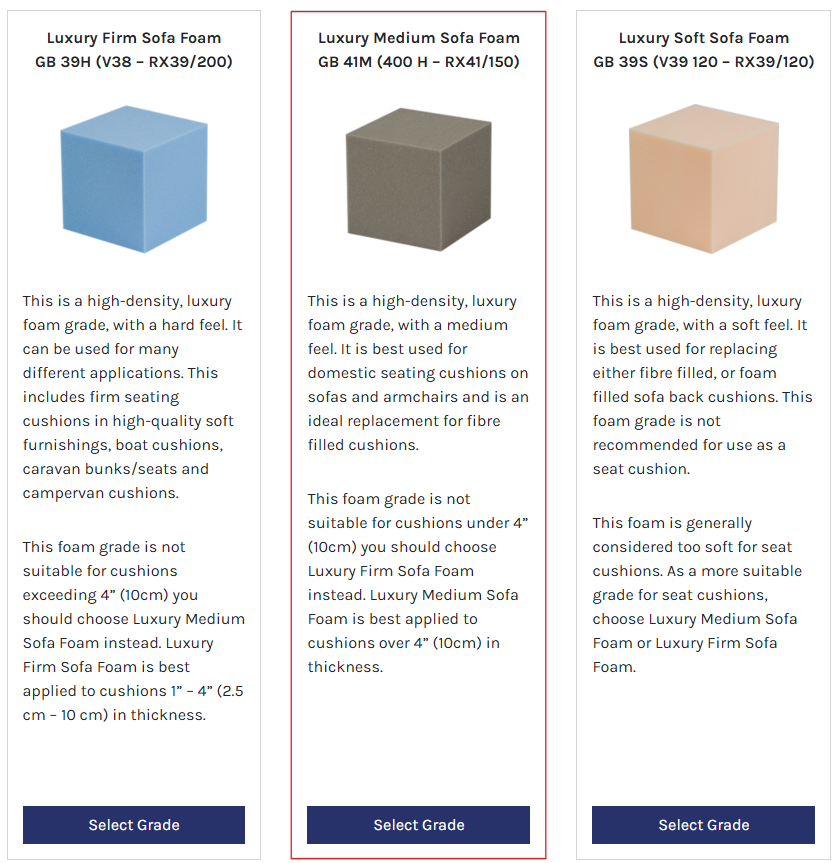
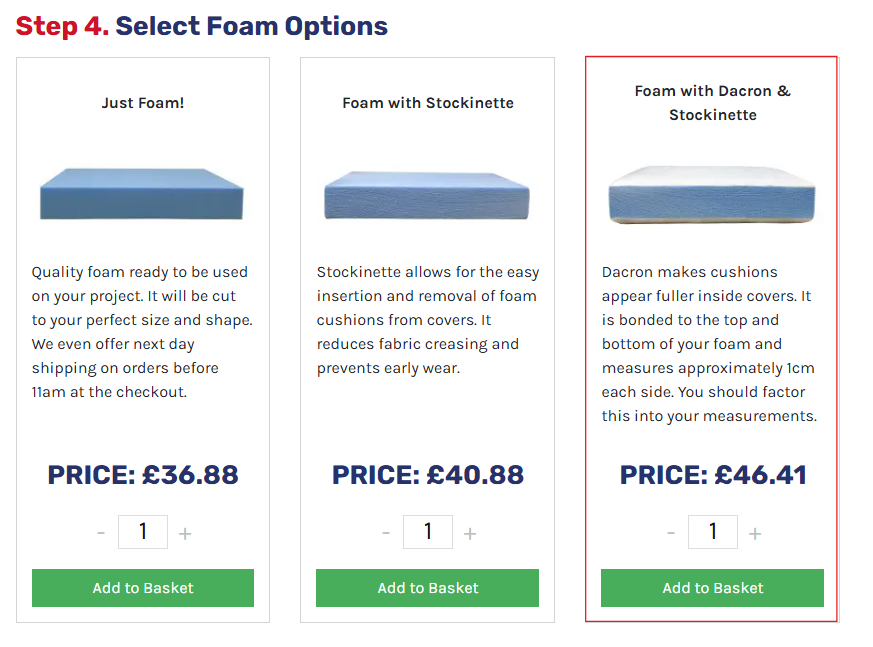
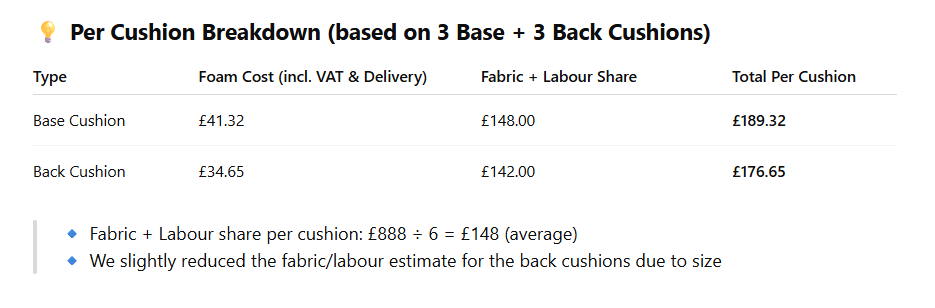
I chose standard sofa cushion foam because I wanted to maintain the harsh, straight lines of my overall design. We had two different cushion sizes: the base cushions measured 59cm x 59cm x 15cm (the prices shown in the images reflect these), and the back cushions were 59cm x 40cm x 15cm. For the full three-seater sofa, we needed three of each — three base cushions and three backrest cushions.
These were the final costs of the foam ready to be upholstered.
FABRIC COSTS
Originally, the fabric was going to be custom-woven as part of my collaboration. However, due to challenges sourcing a Jacquard loom at the scale we needed and finding someone who could produce it within our timeframe, we decided to purchase upholstery fabric instead. I haven’t been heavily involved in the fabric selection process, as it’s been led by my collaborator, but she has informed me that the required length will cost approximately £600.
UPHOLSTERY COST
Like the fabric, this aspect of the project has been largely out of my hands due to the nature of the collaboration. I’ve been informed that the labour cost for professionally upholstering the six cushions is approximately £288.
Final Retail Pricing Strategy
Throughout this project, one of my main goals has been to fully understand the true costs behind producing my designs, not just the raw manufacturing price but also the additional costs and time investments that would come with turning this into a real product I could sell professionally. I wasn’t simply focused on the cost of fabrication; I wanted to make sure I factored in every future business cost I’d need to run this sustainably—things like software licensing, hardware, packaging, and the very real fact that many galleries or retailers will take up to a 50% commission on any sale. Even direct-to-consumer sales often involve a 20–25% retail markup once you factor in taxes, transaction fees, and marketing.
To make sure my pricing felt fair but competitive, I also looked closely at what else is out there on the market. I researched brands like HAY, Hem, Very Good & Proper, and Buster + Punch, all of whom operate within the world of modular or metal-framed furniture. I found that smaller metal and modular side tables or stools typically start around £450, while more involved seating systems can reach £1,500 or more per module, especially when upholstery is involved. That gave me a solid sense of where my pieces might sit in the broader landscape.
What I didn’t want to do was drop into the £300–£400 zone like IKEA’s modular ranges or basic Habitat entry-level systems—that kind of pricing doesn’t reflect the craftsmanship, materials, or flexibility I’ve built into my design. But equally, I didn’t want to overreach into the £2,000+ price points you might find from Tom Dixon or BD Barcelona, where you're paying a premium for an established brand name and years of market validation.
So instead, I’ve landed on a pricing structure that reflects the actual time, labour, and material cost of producing each piece, while still making sure I can build a sustainable future business from it.
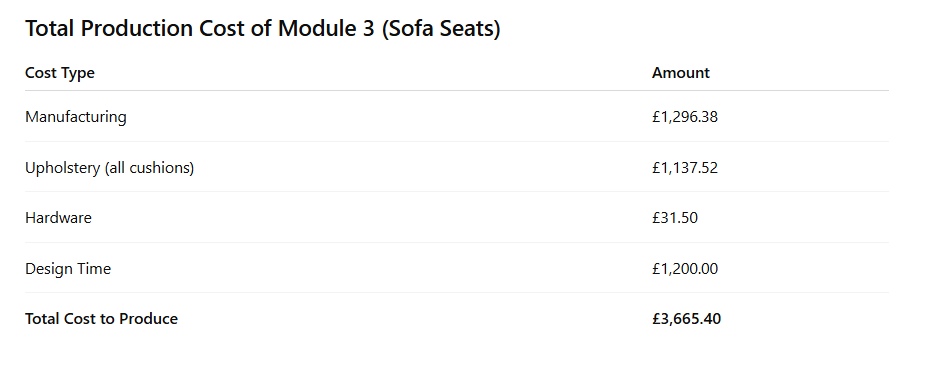
Module 3 – Sofa Seats
Hardware Costs
- 90 screws (nuts + bolts): 90 × £0.35 = £31.50
Upholstery Costs (for 3 Base & 3 Back cushions)
Foam:
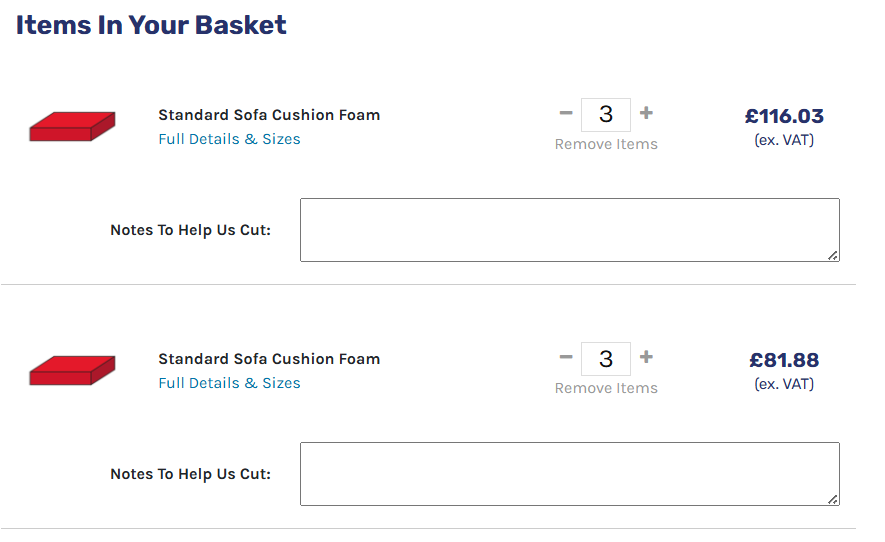
- Base cushions: 3 × £38.68 = £116.04
- Back cushions: 3 × £27.30 = £81.90
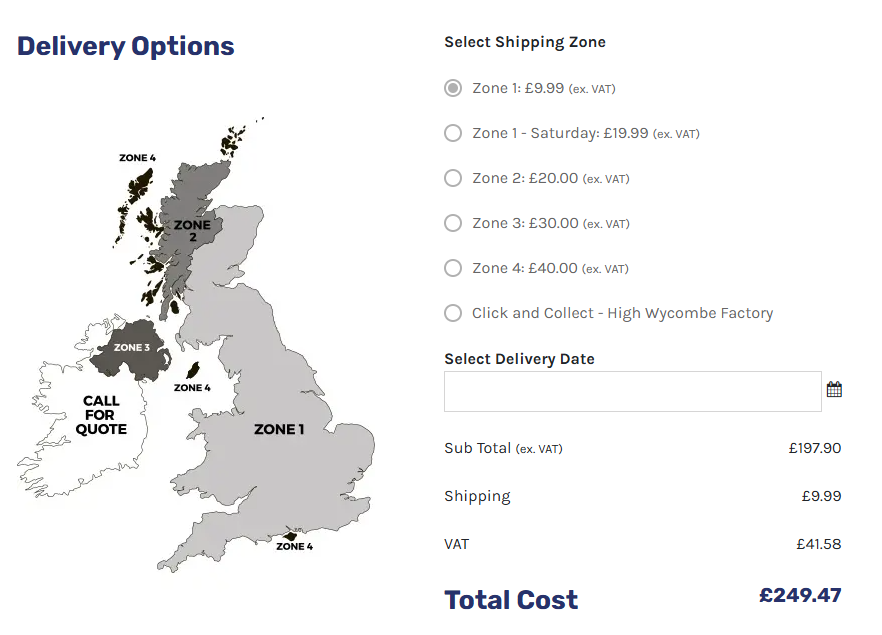
Total foam: £197.94
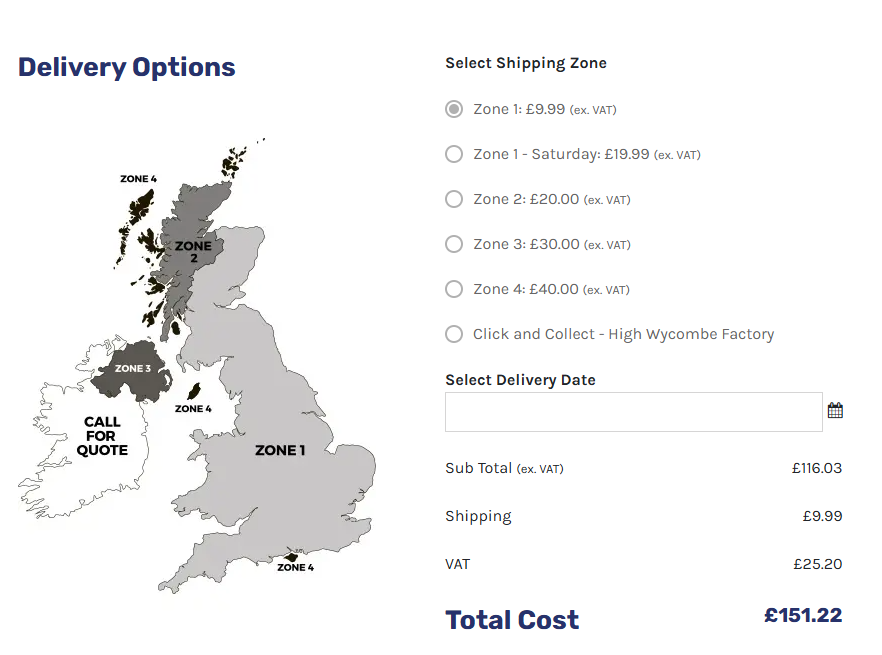
Delivery: £10.00
VAT (20% on foam + delivery): £41.58
Total: £249.52
Fabric (all cushions): £600.00
Upholstery labour: £288.00
Total upholstery cost: £1,137.52
Manufacturing Cost (High Speed Lasers Quote)
Total quote: £1,296.38
Design & Prep Time
~80 hours spent on CAD, emails, revisions, file formatting, supplier comms
At £15/hour (realistic freelance rate for junior designer): 80 × £15 = £1,200.00
To determine the retail price, I’ve taken my full production cost and added a sustainable markup that considers future costs of running this as a business. The 50% gallery commission isn’t added on top of the cost; it’s taken from the final retail price — so I’ve calculated my margin accordingly.
Recommended Retail Price (RRP) for Full Sofa (3 seats): £4,800
Covers all direct costs and leaves enough profit to reinvest, even after a 50% gallery commission.
Price Per Sofa Seat (sold only as part of a full unit): £1,600
This pricing places me well above the budget furniture market, while still under the more luxurious, high-end modular ranges. It acknowledges the flexible system and high-quality materials I’ve used, without reaching into a range that might feel inaccessible or unjustified.
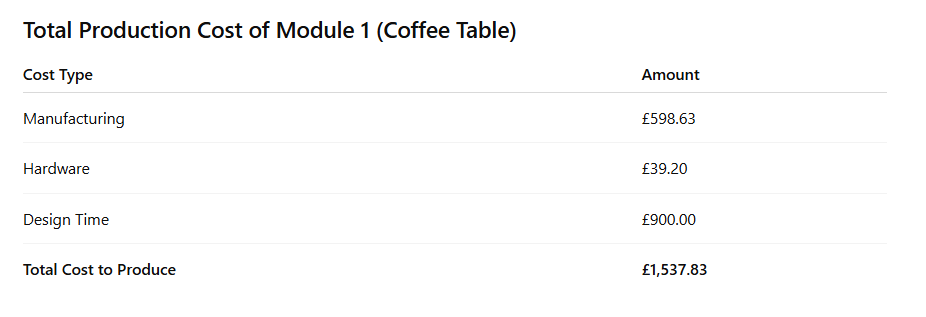
Full Cost Breakdown: Module 1 – Coffee Table
Hardware Costs
- 112 screws (nuts + bolts): 112 × £0.35 = £39.20
Manufacturing Cost (High Speed Lasers Quote)
- Coffee table: £598.63
Design & Prep Time
- 60 hours on design development, CAD iterations, supplier emails, preparing files
At £15/hour = 60 × £15 = £900.00
Just like with the sofa, this price needs to make space for all future business costs — things like software, packaging, admin, marketing, and gallery/retailer fees. That’s why I’ve priced it to allow for a 50% gallery commission, not just covering the costs but leaving room for profit, growth, and flexibility in how I sell the work.
Recommended Retail Price (RRP): £1,650
This allows for gallery fees while still positioning the piece competitively within the design market.
Selling direct-to-consumer with a 25% markup still keeps me well within a profitable range.
This puts me above the entry-level design brands but still well under some of the higher-end studio furniture pricing. It also reflects the robustness, adaptability, and modular potential of this coffee table — something most mass-produced pieces can’t offer.
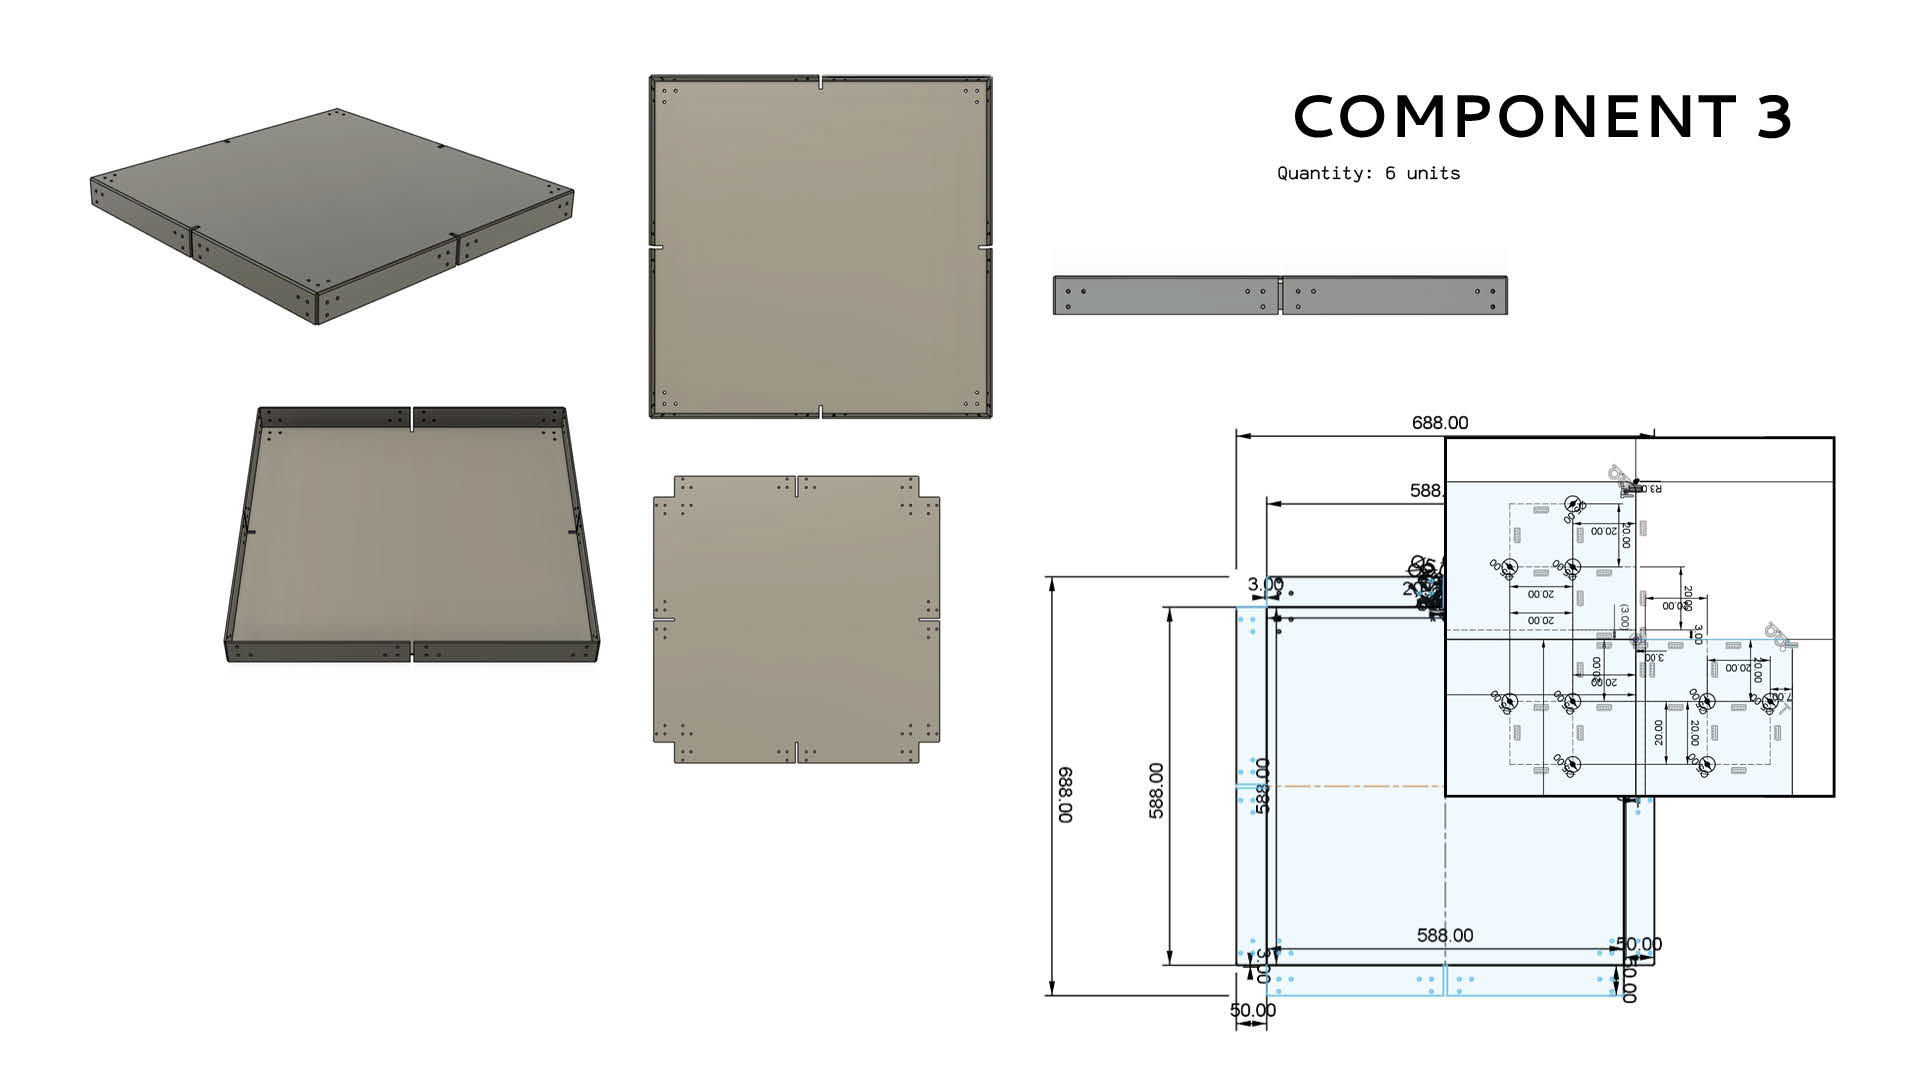
Module 2 – Shelving Stand
Using the same components as Module 1, Module 2 can be configured into various shelving stands. I’ve listed this as a bundled set of specific components, allowing Modules 1 and 2 to be purchased either individually or together. Below, I’ve outlined the cost of buying each component separately, followed by the discounted price when purchased as a bundle.

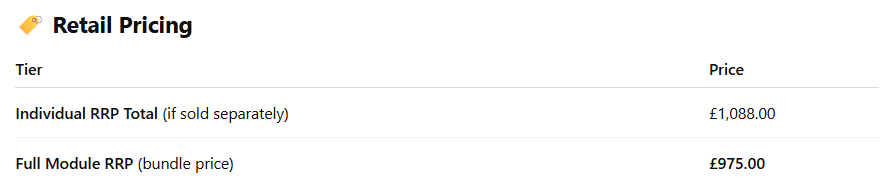
Individual Components
I set out to create a collection of standardised components that allow users to choose and build according to their own design needs. The aim is to encourage creativity by offering a flexible framework that can be adapted into various forms. To make this work, I priced each individual component based on its production cost and complexity. I also ensured that the total cost of purchasing components individually would be higher than buying them as a complete set. This approach was intentional, to highlight the value of the bundled options and make them more appealing to users.
Critical Reflection
Looking back at the entire pricing journey for this project, I’ve realised just how vital it is to understand the full scope of what it takes to bring a product from idea to market. I didn’t just want to create a design and hope for the best — I wanted to be intentional, strategic, and realistic. This meant going far beyond just calculating the production costs. I had to get serious about understanding overheads, market positioning, time investments, and the real-life costs that come with making something professionally viable.
One of the major highs of this process was being awarded the funding from Vertical Gallery. At that point in the project, it felt like a real moment of validation — it gave me the opportunity to take the next steps without being held back financially, and it made me feel like this could be more than just a student project. But the excitement was quickly met with a reality check. Once I started getting proper quotes back from manufacturers, the numbers were significantly higher than what I had originally expected or budgeted for. I remember thinking that it might not even be possible to finish the project within the money I had available. There was a genuine low point where the quotes were coming in way over budget, and I was questioning whether I’d misjudged the whole thing.
But in hindsight, those moments were some of the most important in the process. They forced me to think critically, negotiate better, break down every cost, and communicate professionally with suppliers. Getting those quotes — even the expensive ones — helped me refine the designs and gain a much better understanding of how manufacturers work, what their constraints are, and how I need to present my ideas to be taken seriously. That kind of professional practice can’t be taught in a lecture — it has to be learned through the experience of actually doing it.
Through this process, I’ve developed a clearer understanding of pricing strategies, profit margins, and how to communicate value to both suppliers and customers. I’ve learned to think not only as a designer but as someone running a business. That includes setting realistic retail prices based on time, hardware, professional labour, and gallery commissions — not just materials. It also includes researching the market properly and making sure I’m not under- or over-pricing my work compared to others.
The experience has shown me how much I enjoy the business side of design. It’s something I’d now seriously consider taking further — whether that’s turning a future project into a fully sellable product or offering custom commissions on a freelance basis. I’ve gained skills in quoting, client communication, and manufacturing workflows that would be essential in either scenario.
In short, while it’s been challenging and at times overwhelming, this pricing journey has helped me grow massively. I now feel equipped to take my work out into the real world — whether that’s through retail, galleries, or working directly with clients. It’s transformed how I see myself as a designer and opened up new possibilities I didn’t fully consider before starting this project.